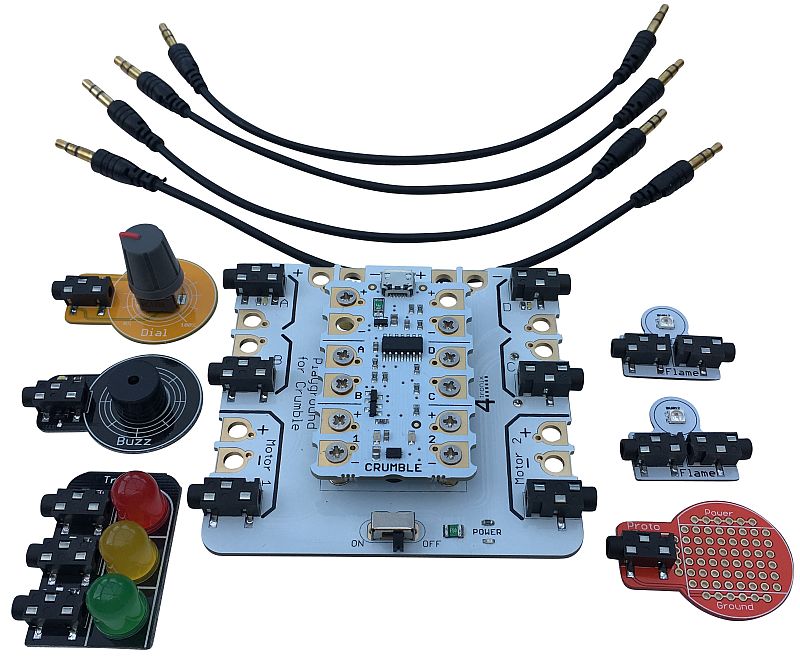
Playground for Crumble, BBC Micro:Bit and Raspberry Pi


(Click on any image to enlarge)
Purchase Here
Playground Overview
The Playground system allows you to connect external electronics (inputs, outputs, sensors, etc.) to your controller. Currently supports Crumble (from Redfern Electronics), Raspberry Pi and the BBC micro:bit.
The connections from the controller are converted to 3-pin 3.5mm jack connections and the connecting cables are 20cm jack cables – although longer cables can be used if required.
The separate electronic parts, Gizmos, can be used with any Playground. The exception being the Motor Gizmo, which can only be used with Crumble, as the micro:bit does not have integral motor drivers.
All of the Gizmos can be used within your programs using the built-in drivers for the relevant part.
Because each connection includes the necessary power and ground, you don’t need to wire these in separately – this transforms what can be a complicated and messy wiring setup into something tidy and more easily understood
Please check out these videos for Playground for Crumble and Playground for MicroBit
Installing Raspberry Pi Software
We have created a python library module that allows you to use the Playground for Raspberry Pi easily and quickly. You can install this from your Raspberry Pi connected to the internet as follows.
- Download the latest version of the software using wget like this from a command line (eg. LXTerminal):
wget http://4tronix.co.uk/pg.sh -O pg.sh
bash pg.sh - This will create a new folder on your Pi in the /home/pi folder called playground (all lower case) with the playground.py library module and example files
Gizmos

Initially, we have 11 Gizmos for sale. These have been colour-coded in a similar way to our Crumbs:
- Blue: Digital inputs, such as a Button or Touch sensor
- Yellow: Analog inputs, such as a Light sensor or Dial
- Black: Digital outputs, such as LEDs or Buzzer
- Red: Analog outputs such as the Servo or Motor
- White: Smart Pixels (aka “neopixels” or “sparkles”), individually addressable, chainable, RGB pixels (Flame, Blaze and Fire Stick)
Button Gizmo
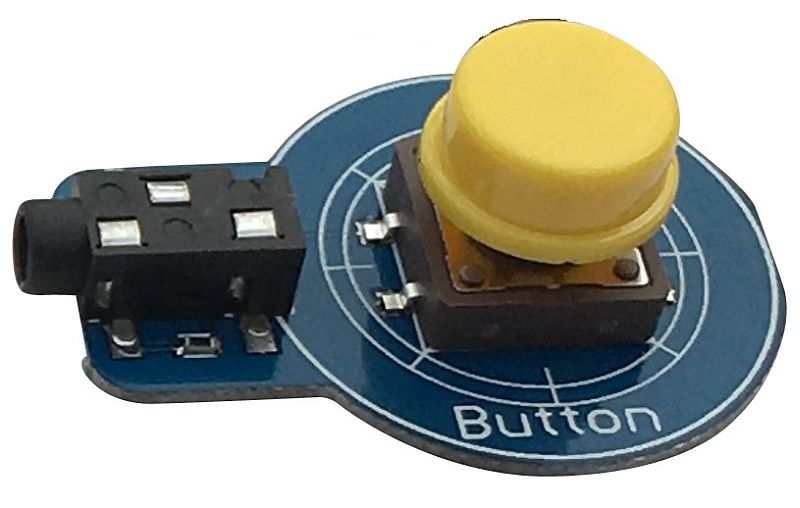
This provides a simple digital input to Playground. It is Active (High) when pressed and inactive (Low) when not pressed. There is a white indicator LED to show whether it is active or not.
Worksheet Links: Crumble BBC micro:bit Raspberry Pi
Touch Sensor Gizmo

This provides a digital input to PlayGround. Simply touch the pad on the sensor for it to become active (High) and release for it become inactive (Low). There is a white indicator LED to show whether it is active or not. In fact the sensor will detect your finger without actually touching, so you can do experiments to see how many sheets of paper you can cover it with before it stops working
Worksheet Links: Crumble BBC micro:bit Raspberry Pi
Dial Gizmo
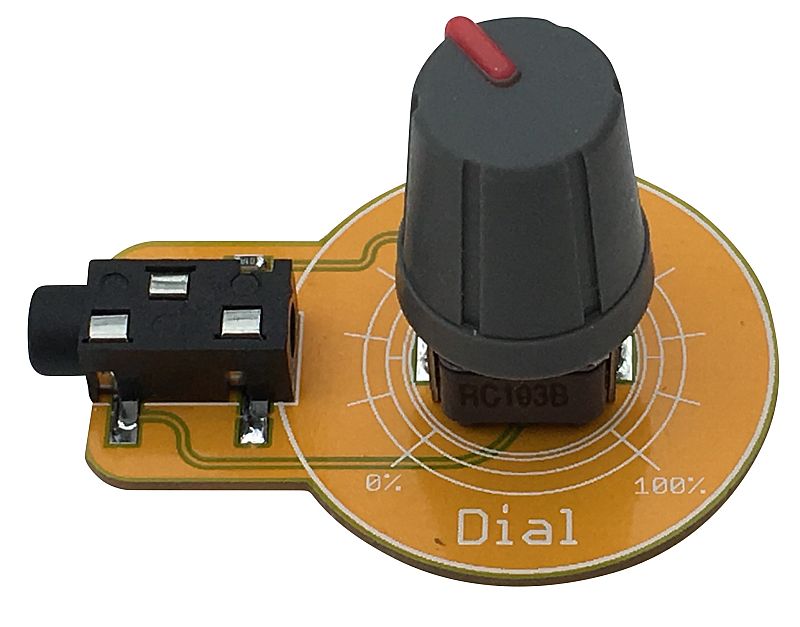
The Dial Gizmo provides an analog input to your Playground. On the Crumble it will read from 0 to 256, while on the micro:bit it will go from 0 to 1023. The actual top end number will vary due to various losses in the system
Worksheet Links: Crumble BBC micro:bit Raspberry Pi
Light Sensor Gizmo
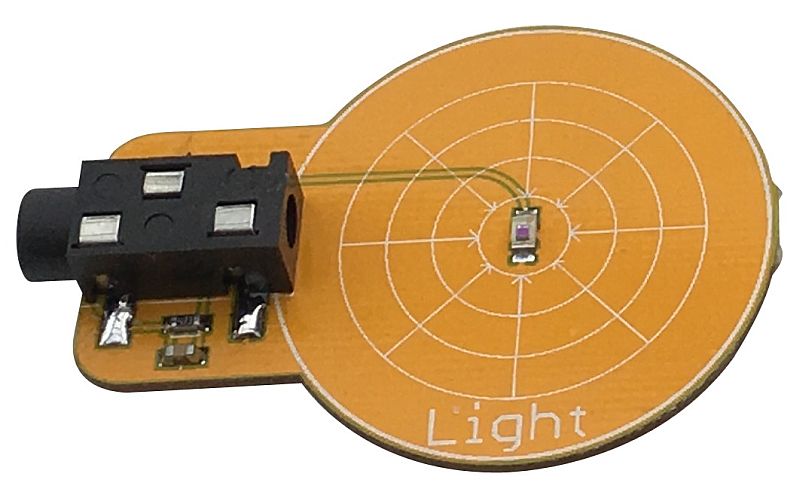
The Light Sensor Gizmo is an anlog input Gizmo that reacts to the brightness of light to the sensor in the centre. It is tuned to be sensitive to daylight. The values vary from 0 (dark) to 256 (bright) on the Crumble, while on the micro:bit it will go from 0 to 1023. The actual top end number will vary due to various losses in the system
Worksheet Links: Crumble BBC micro:bit Raspberry Pi
Traffic Light Gizmo
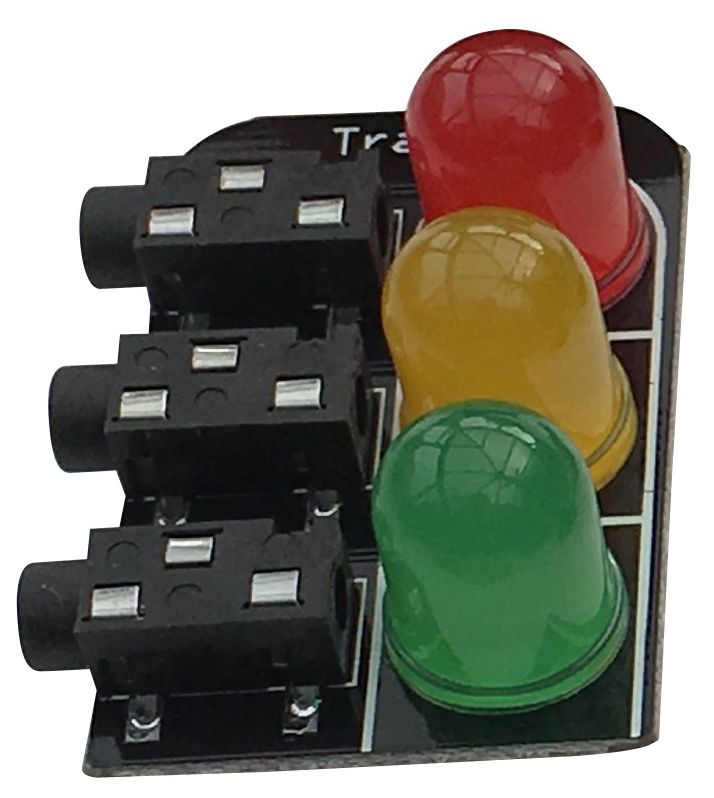
The Traffic Light Gizmo is a digital output Gizmo for your Playground. Each of the large 10mm LEDs will turn on when the appropriate input is set to High. There are three inputs, one for each of Red, Amber and Yellow
Worksheet Links: Crumble BBC micro:bit Raspberry Pi
Buzzer Gizmo

The Buzzer Gizmo is a digital output Gizmo for your Playground. When the input is set to High, the buzzer will sound and a white indicator LED will light
Worksheet Links: Crumble BBC micro:bit Raspberry Pi
Flame Gizmo

The Flame Gizmo provides a single, fully controllable, RGB pixel. This allows you to change the colour to any one of 16 million different colours. These are chainable, with both an input and an output connector. On the Crumble, these “smart pixels” are referred to as “Sparkles”, while on the micro:bit they are known as “neopixels”
Worksheet Links: Crumble BBC micro:bit Raspberry Pi
Blaze Gizmo

The Blaze Gizmo gives you a ring of 8 , independently controllable, RGB pixels. This allows you to change the colour of any or all of them to any one of 16 million different colours. On the Crumble, these “smart pixels” are referred to as “Sparkles”, while on the micro:bit they are known as “neopixels”. These can be added onto the end of a chain of Flame Gizmos if required, or used on their own
Worksheet Links: Crumble BBC micro:bit Raspberry Pi
Servo Gizmo

As the name suggests, this Gizmo allows you to very easily connect a miniature 9g servo to your Playground. Plug it in, then program it for a 180 degree range of movement. With the Crumble, the allowable range is -90 to +90. Do not try and use it outside the allowable range.
Worksheet Links: Crumble BBC micro:bit Raspberry Pi
Motor Gizmo
(Not compatible with micro:bit Playground)

The Motor Gizmo is driven directly from the Crumble motor driver outputs – it cannot work with the micro:bit. Use the Crumble motor control blocks to set the speed and direction of up to 2 Motor Gizmos. You can build yourself a robot very easily with 2 of these
Worksheet Links: Crumble (BBC micro:bit and Raspberry Pi not available – a prototype motor Gizmo for Pi is shown at top of page – this has a built in motor driver.)
Prototyping Gizmo
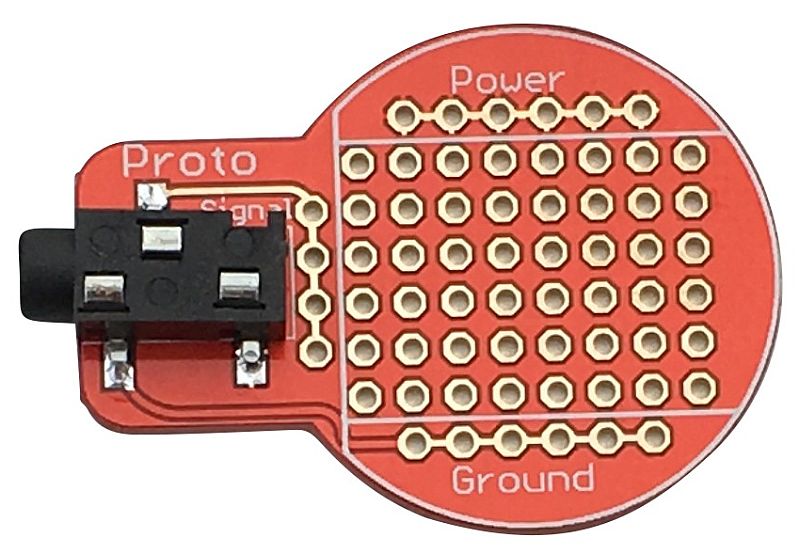
This simple Gizmo allows you to build your own Gizmo for those inputs or outputs that are not yet available as a ready-made Gizmo. For instance, you could make a temperature sensor, or have a controllable relay. The board has 4 holes for the Signal, 6 for each of Power and Ground, and 48 for you to use for your creation.