Using Cube:Bit with Raspberry Pi

Using Cube:Bit with Raspberry Pi

IMG_2288a

Attaching the Raspberry Pi

The Cube:Bit is a 3D array of neo-pixels (SK6812-3535 to be precise). As such it can be accessed like any other strip, ring or matrix of neopixels using WS2812B compaible code.

The base for the Cube:Bit (available separately) contains a 40-pin GPIO connector, into which a Raspberry Pi Zero can be connected directly. “Full size” raspberry Pis can be connected using a ribbon cable.

The 5V supply provided to the Cube:Bit base is also passed to the Raspberry Pi to power it, so no additional power is required.

Only BCM18 (physical pin 12) is used from the Raspberry Pi. This is the PWM pin that all neopixel code uses to communicate, so all existing code will work without changes.

Note: There is a power input selection jumper on the Cube:Bit base. Ensure the jumper is in the correct place for your power supply (usually USB or DC Jack)


Adding the Neopixel Driver to the SD Card

If you have already used neopixels on your Raspberry Pi with the SD card you are using, then you don’t need to do anything here. Your existing code will work, although you would get strange shapes due to the layout of the individual LEDs in the Cube:Bit.

If you haven’t already installed the driver then there are a number of ways to do it. I find the easiest and reliable way is to run Pimoroni’s curl script from here: https://github.com/pimoroni/unicorn-hat Ensure your Raspberry Pi is connected to the internet and then type:

\curl -sS https://get.pimoroni.com/unicornhat | bash

You do not need to install the unicorn hat examples (although having a Unicorn Hat and using the examples is an excellent idea!)

This has now added the rpi_ws281x driver for neopixels. This driver is used by the Cube:Bit library


Adding the Cube:Bit Library and Examples

The cubebit.py library module is a layer over the rpi_ws281x driver library that implements functions specific to the Cube:Bit, such as mapping x, y, z co-ordinates to specific pixels, writing to defined planes, etc.

Although not strictly necessary (you could write your code to talk directly to the rpi_ws281x driver), it does allow code from the Microbit using the Makecode package to be easily ported to Raspberry Pi as many of the same library calls are implemented in the same or similar ways.

Again, with your Raspberry Pi connected to the internet, run the following commands to download the cubebit.py library and example code

wget http://4tronix.co.uk/cb.sh

bash cb.sh

This has now created a cubebit folder on your Raspberry Pi which contains the cubebit.py library and a number of example programs.

NB. For all these examples you should change the variable side to be the number of pixels per side on your Cube (eg. 3, 4, 5 or 8). This is always set near the top of the program. side = 5

You will need sudo access to run these, so for example: sudo python purpleRain.py

Type Ctrl-C to exit these demos.

  • test.py shows a rainbow on all pixels for 50 seconds, then starts stepping through each x,y,z value with a single yellow-ish pixel
  • purpleRain.py shows a cloud of purple pixels on the top layer, then flashes white (lightning), then the raindrops fall randomly and collect in a pool at the bottom. Finally, the “water” is recycled via one edge back to the top
  • planeTest.py moves a plane of randomly coloured pixels through the Cube:Bit in each direction repeatedly


Cube:Bit – Magical RGB Cubes

Cube:Bit

Magical RGB “neo-pixel” Cubes of awesome

IMG_2188a

Purchase Cube:Bit here

The Cube:Bit collection is a range of 3D “neo-pixel” compatible cubes that are easily built from individual 2D slices.

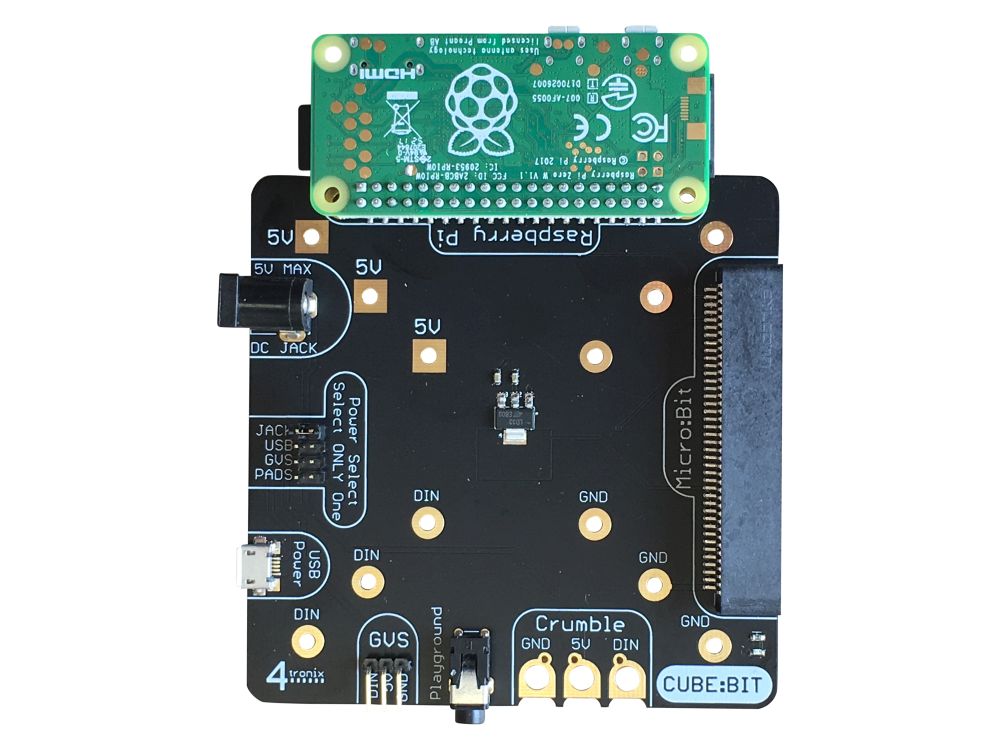
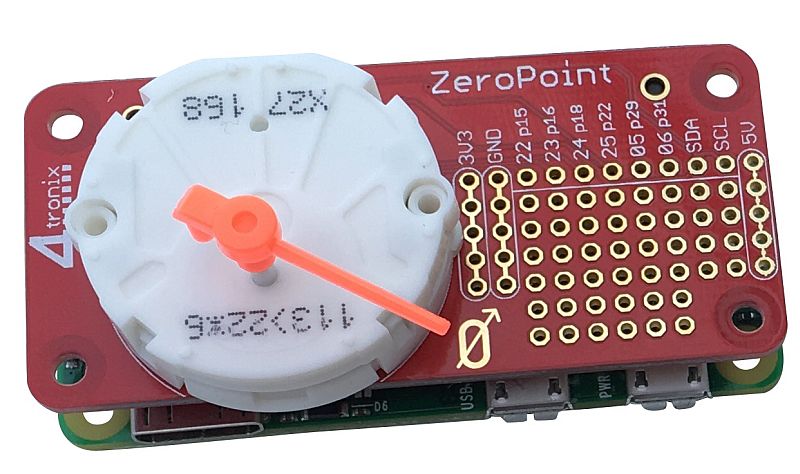
The current range consists of 3×3, 4×4 and 5×5 slices together with a base unit that allows power to be added easily (big cubes can use a lot of power), and also allows a Micro:Bit or Raspberry Pi Zero to be plugged in directly. Of course you can use the Cube:Bits without the base and with any microcontroller thats supports neopixels: Arduino, Raspberry Pi, even Crumble (although the Crumble only supports up to 32 pixels at present, so only the 3x3x3 Cube:Bit can be controller)

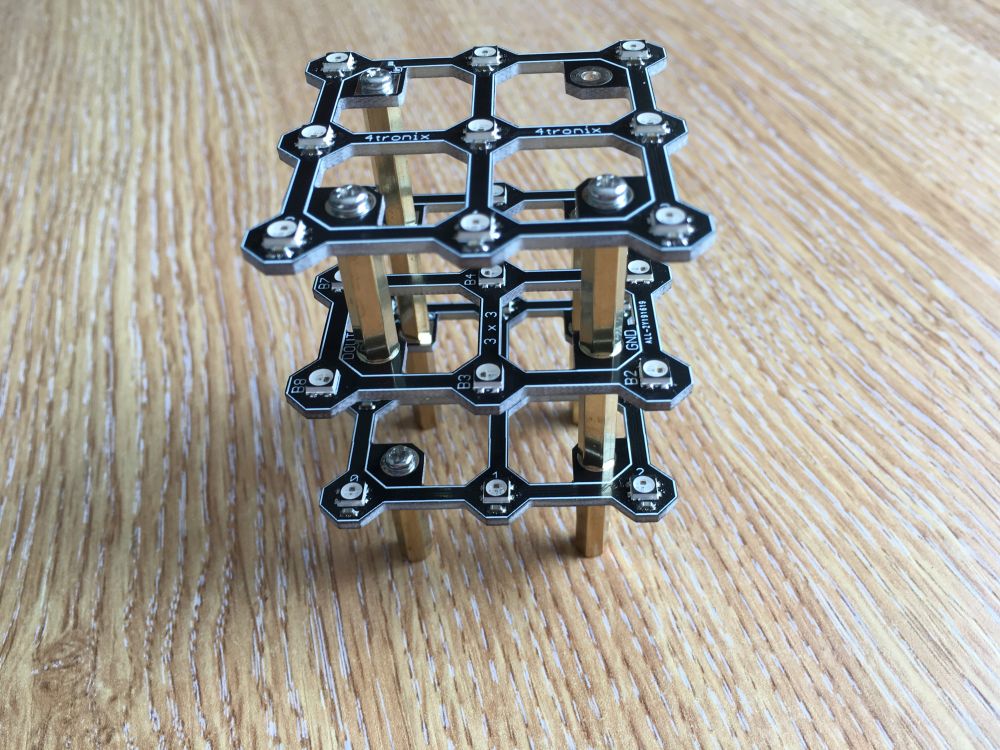
Assembling the cube is easy with threaded rods in each corner providing the structural strength as well as the electrical connections.

Programming it is equally simple as these just appear as a string of neopixels, so use your favourite neopixel driver for your controller.

For the BBC Micro:Bit we have developed a MakeCode package that allows you to use the Cube:Bits extremely simply as well as giving you full x,y,z control of each pixel.

Cubebit_Package01

Assembling a Cube:Bit

The basic construction method is:

  1. Place the 1st slice A-Side up
  2. Place second slice B-Side up, ensuring Vcc/5V and Gnd are in correct place
  3. Place third slice A-Side up
  4. Continue placing slices as required, alternating A-Side and B-Side
  5. Each Slice has a DOUT (Data Out) from the lower slice connected to its own DIN (Data In) connection. This means that there is a “free-hanging” female-female pillar which is alternately on the left and then on the right, with a matching gap in the vertical pillars on the opposite side
  6. You can stack these as high as you want – no need to limit yourself to a simple Cube – but watch the power requirements!

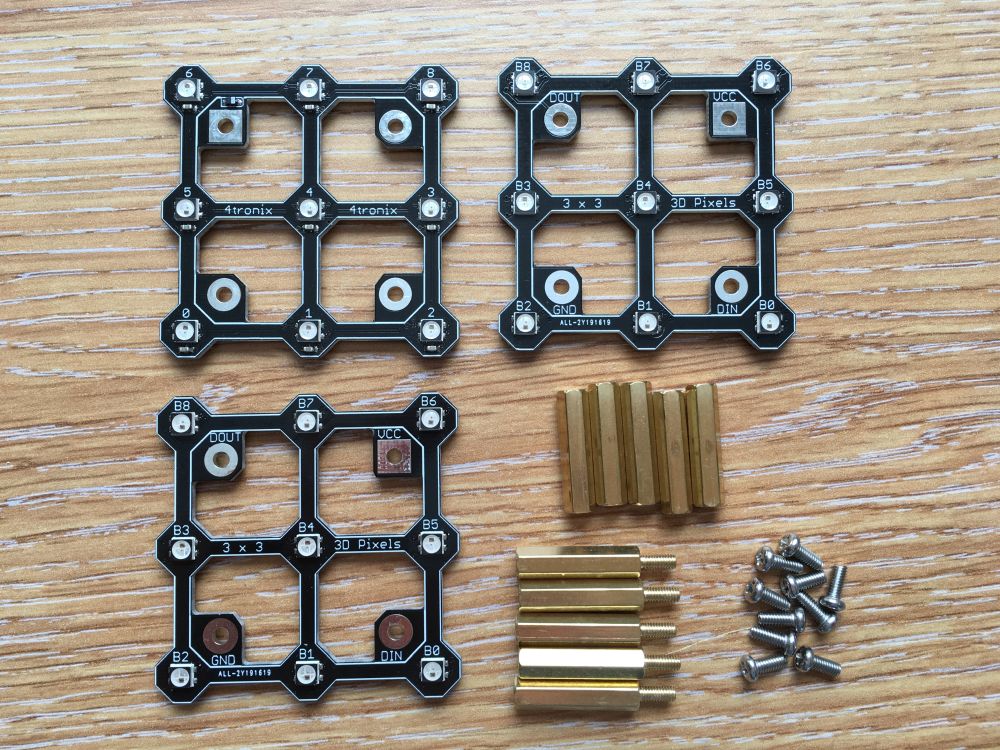
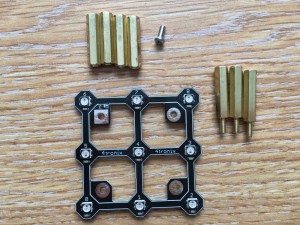
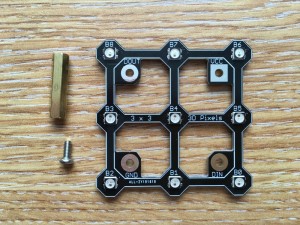
Step 1 – Check you have all the bits

IMG_2198a

3x3x3 – 3 slices, 5 female-female pillars, 5 male-female pillars, 10 screws

4x4x4 – 4 slices, 6 female-female pillars, 7 male-female pillars, 12 screws

5x5x5 – 5 slices, 7 female-female pillars, 9 male-female pillars, 14 screws

The construction method is the same for all Cube:Bit sizes. Just keep going upwards as you add more slices

IMG_2199a

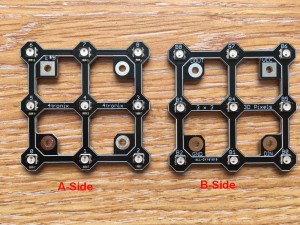
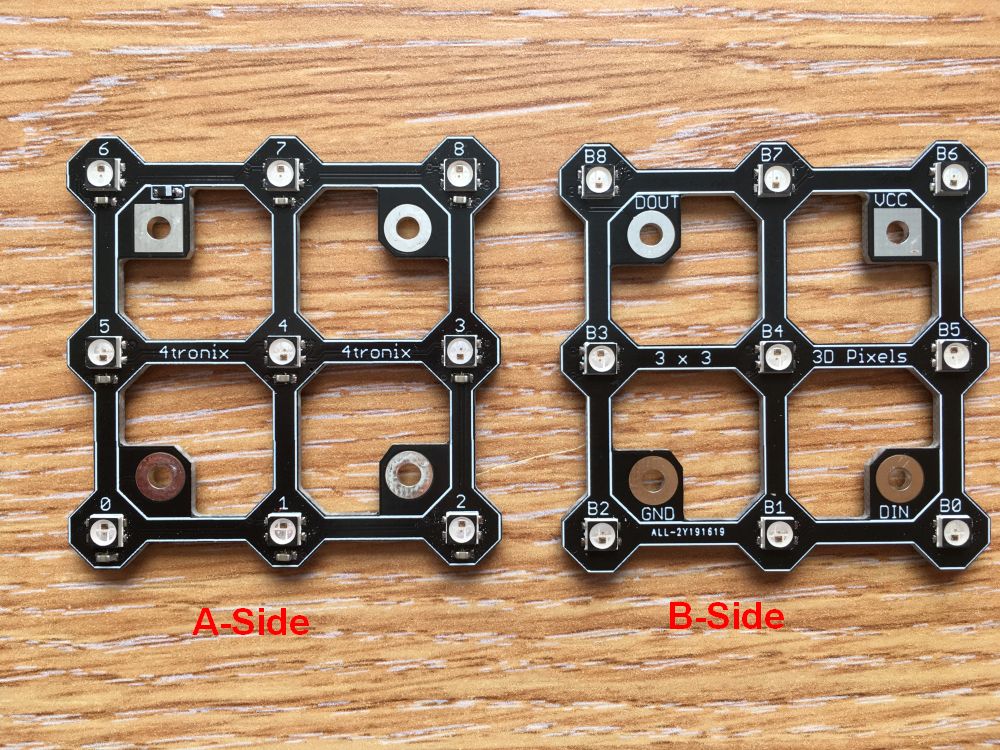
Make sure you can tell which is Side A and which is Side B for each slice (These are more clearly labelled on release version):

  • Side A has the names for each LED as 0, 1 , 2, 3, etc.
  • Side B has the names as B0, B1, B2, etc.

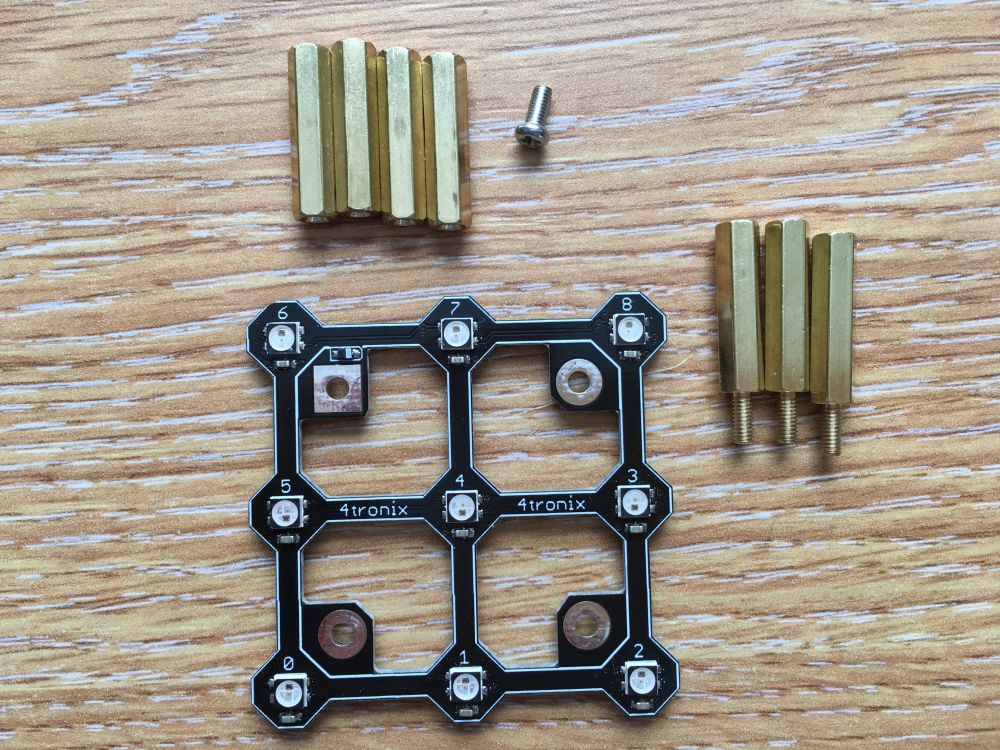
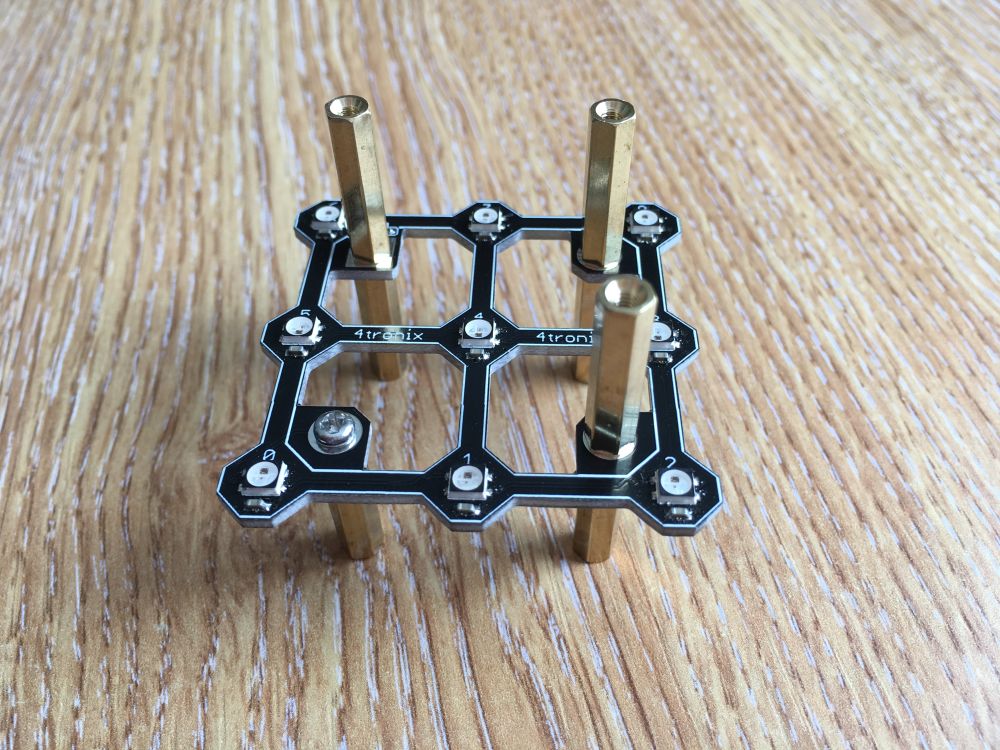
Step 2 – Add Pillars to bottom slice

IMG_2200a

You will need 4 female-female pillars for underneath, and 3 male-female pillars and a screw for the top

Make sure you have the slice with the A-Side upwards, then fit a female-female pillar below the DIN connection (next to LED 0) using the screw

IMG_2201a

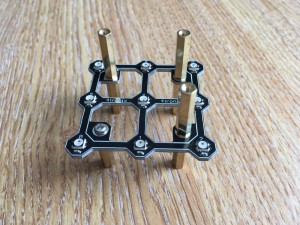
Fit the other 3 female-female pillars using the male-female pillars to hold them in place

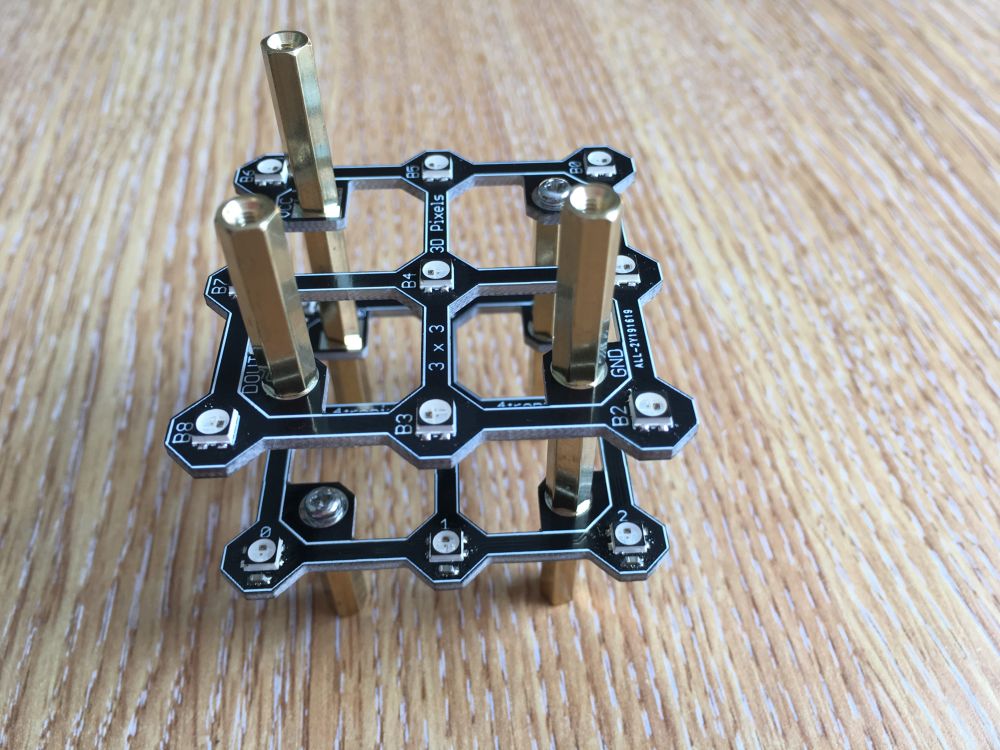
Step 3 – Prepare the Second Slice

IMG_2202a

Make sure the slice is B-Side upwards, then take a female-female pillar and a screw and fit the pillar on top of the slice in the DOUT connection (next to B8, B15, or B24 depending on your cube size)

IMG_2203a

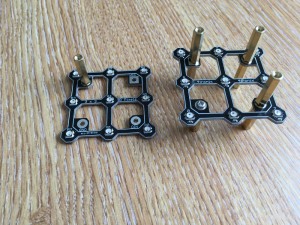
Step 4 – Fit the Prepared Second Slice

IMG_2204a

Use 2 male-female pillars and a screw.

IMPORTANT: Make sure you place Vcc/5V on this slice directly above Vcc/5V on the slice below.

Screw the pillar from the DOUT of the lower slice into DIN of this slice using the screw

Then use the male-female pillars to attach the remaining 2 pillars from below

IMG_2205a

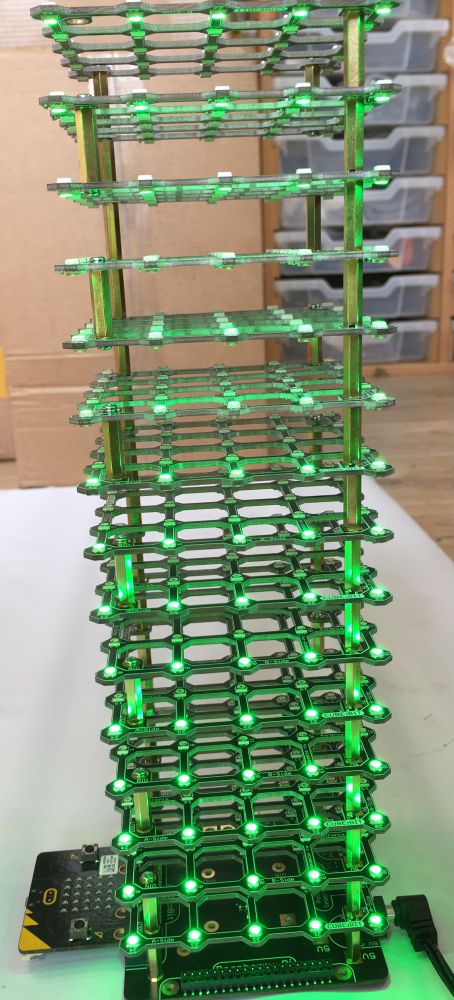
Now repeat steps 3 and 4 as often as required, remembering to alternate A-Sides and B-Sides as you stack the slices

IMG_2279a

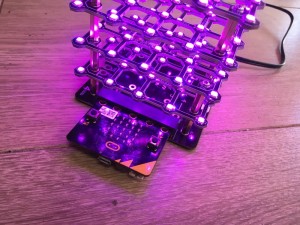
In fact you can keep going as high as you like to make a tall tower – this one is 5 x 5 x 15 slices high

TIP: If you are using the Makecode extension, then there is a block called “set height of tower” that you should use before the “create cube:bit” block

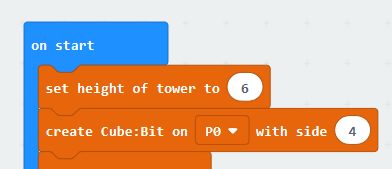
Access this block from the …more category within the Cubebit extensions

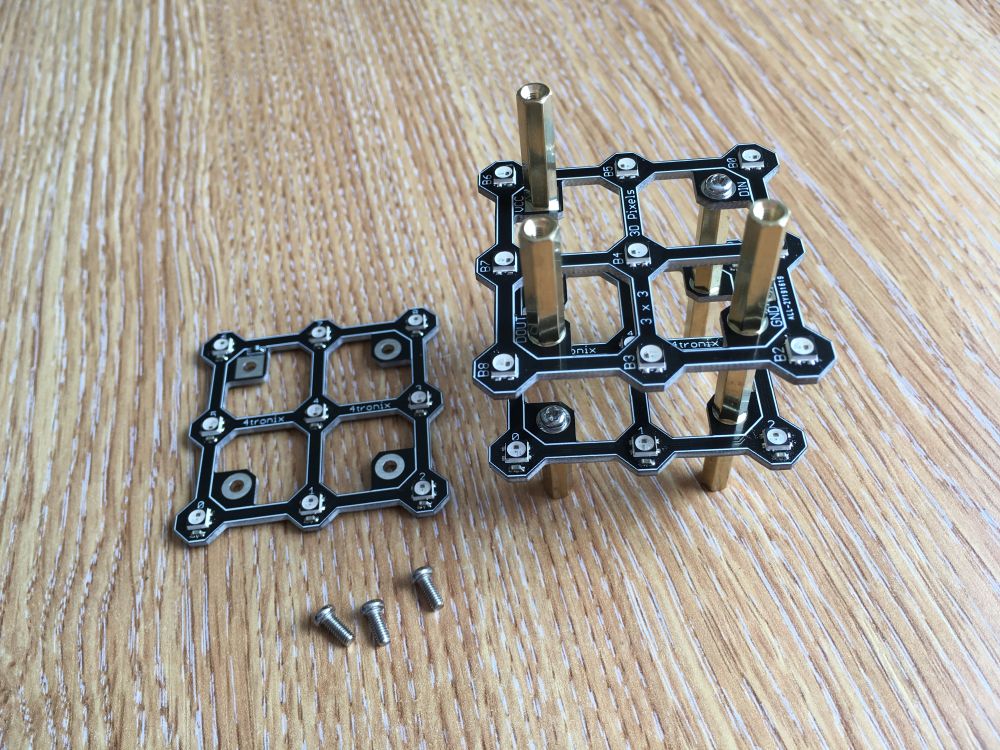
Step 5 – Fit the Top Slice

IMG_2206a

Back to A-Side upwards (assuming 3x3x3 or 5x5x5).

Use three screws to fit the top slice, ensuring that it is DOUT that is NOT connected and that Vcc of this slice is still above Vcc of previous slice

IMG_2207a

You now have the completed cube on legs as well as spare screws/pillars.

Final options at this point are:

  1. Leave as is and use croc clips (alligator clips) to connect to the legs for 5V, Ground and Signal
  2. Connect to the base using 4 of the spare screws. Make sure you connect 5V and Vcc
  3. Remove the bottom legs and change the first pillars to female-female held in with screws. This makes a tidy cube, then connect to it using soldered wires or tags, etc.

Powering Your Cube:Bit

These cubes have a lot of LEDs and LEDs require power. The 3x3x3 has 54 LEDs and the 5x5x5 has 250 LEDs. On full brightness with White colour this will be several amps.

You _can_ drive them with a low current as long as you set the brightness down low (40 or less) and you don’t set a lot of LEDs to white. This is perhaps suitable for the 3x3x3 cube.

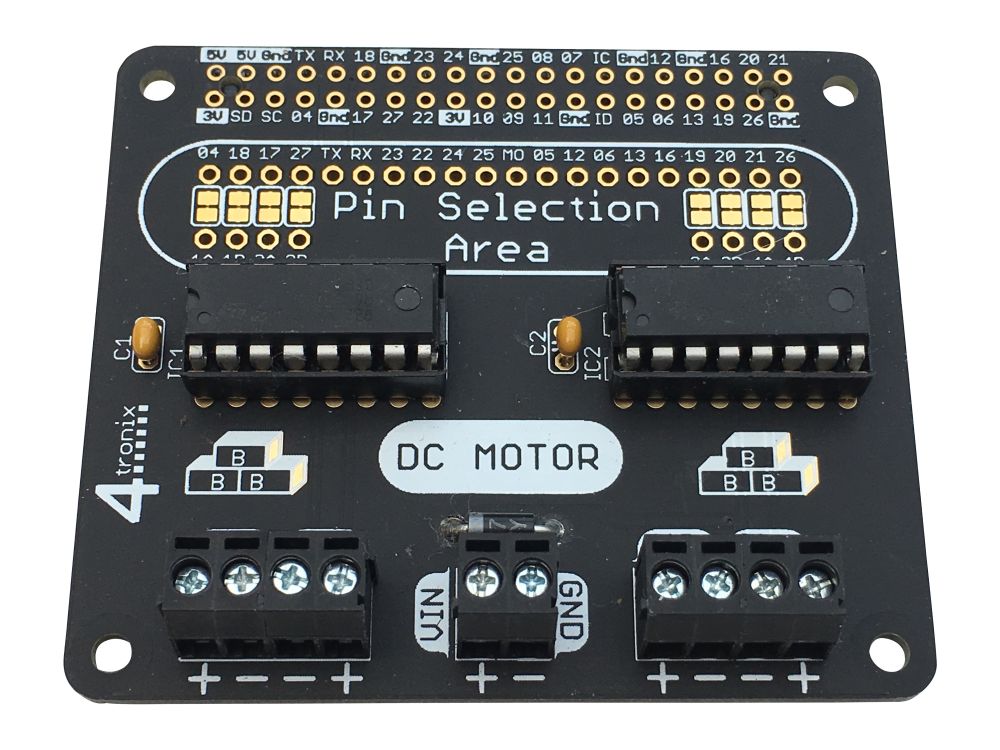
I recommend however using the base and supplying power either via the USB connection or the DC jack connection. There are other connectors on the base as well. Make sure you have changed the jumper to select the power input you are using!

Example currents used (powered by 5V)

  • 3x3x3 all LEDs at Red, brightness 40 (out of 255) – Current 150mA
  • 3x3x3 all LEDs at White, brightness 40 – Current 340mA
  • 3x3x3 all LEDs at White, brightness 255 – Current 1.9A
  • 4x4x4 all LEDs at Red, brightness 40 – Current 350mA
  • 4x4x4 all LEDs at White, brightness 40 – Current 800mA
  • 4x4x4 all LEDs at White, brightness 255 – Current 4.5A
  • 5x5x5 all LEDs at Red, brightness 40 – Current 680mA
  • 5x5x5 all LEDs at White, brightness 40 – Current 1.6A
  • 5x5x5 all LEDs at White, brightness 255 – Current 8.75A

These numbers are important. For instance on the microbit you shouldn’t power the LEDs directly.

So use a 2.5A power supply for the 3x3x3 cube, 5A for 4x4x4 and 10A for the 5x5x5. Although if you set the brightness down low etc. then using lower current power supply is possible and we do most of our testing using a 4A supply. If the brightness is set to 40 (the default) then you can use a 3x3x3 cube with 0.5A power supply and a 4x4x4 with 1A.

Connections:

  • Signal from controller (eg Micro:Bit) to DIN on the bottom slice
  • Ground from controller to GND on bottom slice
  • Ground from power supply to GND on bottom slice
  • Power from 5V DC power supply to Vcc/5V on bottom slice

IMG_2208a

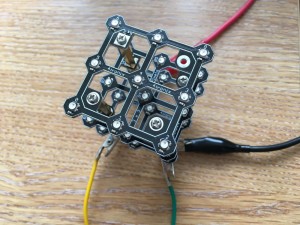
Photo above shows using croc clips to connect to the legs. Yellow is signal from Micro:Bit Pin 0, Green is Gnd from Micro:Bit. Black is Gnd from power supply and Red is power from power supply

IMG_2209a

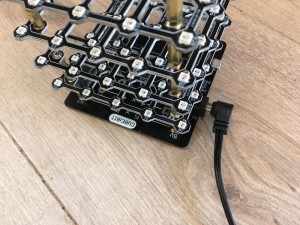
In the photo above we’re using a 5V DC power supply with a 2.1mm DC Jack connector (centre positive) that connects directly onto the base. The signal and ground from your controller of your choice then connect elsewhere on the base (eg. the croc clip connection or the GVS connector or the 4tronix Playground connector)

Using Cube:Bit with Raspberry Pi

Please follow this blog entry for installation, Cube:Bit python library and examples.

MakeCode for Micro:Bit Extension

There is a Makecode extension that makes it easy to use the Cube:Bit using x,y,z three-dimensional matrix address of the pixels.

The slice is physically laid out with the LEDs snaking from the DIN corner then back along the next row, and so on until it reaches the DOUT corner (ie. along x axis then along y axis). As alternate slices are mounted upside down and rotated, then the snaking goes along y-axis then along x-axis in these slices. So it is much easier to use the built-in mapping block.

To load the package (until it is formally released) go to Advanced (or click on cog icon) then select Extensions. In the search box add the URL https://github.com/4tronix/cubebit

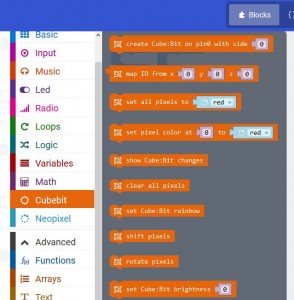
This provides the following blocks:

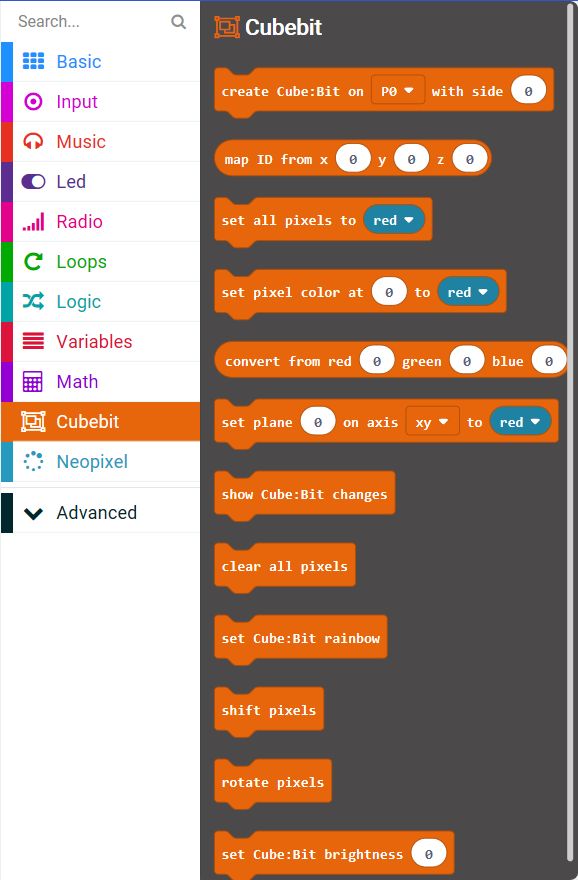
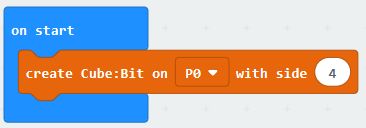
Your first block in the start of program should create a cube of the correct size. If you are using the Cube:Bit base then this will connect via Pin0, but you can change this when not using the base. This will create a string of neopixels of the correct length for your cube and set the brightness to the default of 40. If you want, you can change the brightness with the “set Cube:Bit brightness” block, anywhere from 0 to 255 (255 is the brightest)

You can then write a colour to any or all of the pixels in the cube. eg set (x,y,z) 2,3,0 to Blue when Button A is pressed

Note that this is using the map block to convert x,y,z co-ordinates to a Pixel ID

Note also that the show Cube:Bit changes block is required to actually set the LEDs to the new values that you have set.

TIP: Setting LEDs is always a two part process. Make all the changes you want then show the changes on the Cube:Bit. Just making the changes has no effect on the pixels as it only changes internal memory. This is the FIRST thing you should check if your program is not creating the effect you require

There is a block that allows you to write to a whole plane of pixels at one time. Decide which axis the plane lies on and which plane within that axis:

Additionally you can specify exactly which RGB values to use, instead of simply picking one of the predefined colours:

Make a Rainbow

An easy and fun way to start is to create a rainbow effect using the built-in blocks

The Start block creates the cube then sets the LEDs to a rainbow scheme (the show cube:bit changes block makes the LEDs match the settings you have selected

Then the Forever block moves the colours all the pixels by one position. Taking the colour of the last pixel and putting it back into the first pixel. This is called rotation. It does this every 20ms so you get an ever-changing colour effect

Example Software

While testing Cube:Bit we have developed a few interesting animations and games for CubeBit

You can download them all from this zip file

Extract the files into a folder on your PC (and remember where you put them)

Then click on Projects, then Import File, then browse to find the file you require.

All examples have a variable called “side” which is set at beginning of the Start block to be 3, 4 or 5 depending which size Cube:Bit you have. Changing the value of side will allow the rest of the program to work correctly and of course affects the way the x, y, z mapping is calculated. You will need to change this line so that it sets the correct size for your Cube:Bit.

  • PlaneBounce – this simply lights up a plane and moves it left and right. Coloured Green going right and Red going left
  • raindrop – sets a blue/white colour to be rain on the top of the Cube, then drops each pixel to the bottom one at a time and randomly. If you tilt the cube, different planes become the top (at the start of each cycle)
  • PurpleRain – as raindrop, but in purple and with a lightning flash at the start and rain recovery animation at the end
  • RainSplash – as raindrop, but makes a little splash as each raindrop lands (not great!)
  • Revolver – rotates planes in random axis and colours. This works best with larger cubes
  • RGBTest – cycles through Red, Green, Blue and White, lighting every pixel on the Cube. A good test of power supply – check the White is actually White and not a yellow/orange colour
  • Scan – lights up all LEDs in x, y, z order from 0, 0, 0 to size of the Cube
  • TimesCube – builds a small 2x2x2 cube in one corner and grows it to fill the Cube:Bit, then shrinks into a different corner. And repeat
  • TicTacToe amd BitCommander – provides a 2 player game of 3D Noughts and Crosses. Install the BitCommander software on the microbit in your Bit:Commander and the TicTacToe software in your Cube:Bit. Use the buttons and dial on the Bit:Commander to move your person around and press on the Joystick to select the pixel you want. The cursor then changes from Red to Green and it is Player 2’s turn. When a line of 3 is made in any direction, the winning line is flashed on and off. Press the Red button on Bit:Commander to start again

Basic Building Blocks

Basic Building Blocks

IMG_1570a

Basic Building Blocks is a range of soldering kits to make Raspberry Pi add-on boards (aka HATs). The 40-pin GPIO connector is already soldered on all boards (including when you purchase “board only” instead of the complete kit). So you typically only have to add a few components and headers by hand.

Because the boards are very basic, you are not forced down one way of operating. Also, all the boards are sold as bare boards (with GPIO header already fitted) or as a complete kit

In addition, by using an extended female header and appropriate mounting pillars, you can stack these boards together allowing multiple functions simultaneously. Many of the boards have the ability to use different pins for each function by changing jumpers or solder jumpers around.

Purchase Basic Building Blocks here

Download the sample software here


DC Motor

IMG_1556aIMG_1553a

Click on any photo to enlarge

This can be purchased as a Quad motor kit or a Dual motor kit. The Quad motor kit comes with two L293D motor drivers, whereas the dual comes with just one.

Make sure you are adept at soldering. There are plenty of good soldering videos on the web and other resources to get you going.

Solder this kit by fitting the lowest height components first: Diode, then capacitors, then IC sockets, then 2-pin screw terminals.

  1. Ensure the diode is the correct way round. White band to the left as shown in the photo above
  2. Capacitors can go either way round
  3. IC sockets should be placed with the notch to the left to match the position of the silk screen on the board (nearest the words IC1 and IC2 as appropriate). If you only have one L293D (ie. the Dual version) then you can choose which position to use
  4. The 2 screw terminals for each pair of motors should be clipped together before connecting to the board. Slide the right hand one down the side of the left one and ensure that it forms a smooth joint all round.
  5. Cut all the pins neatly underneath using side-cutters, not forgetting the screw terminals which could foul on the HDMI header of the Pi if left long
  6. Insert the L293D driver chips with the notch on the chip matching the notch on the socket

Now you’re ready to go. Plug it carefully onto your Pi and use whatever language you want to control it.

The default pins are:

  • Motor 1: 04, 18
  • Motor 2: 17, 27
  • Motor 3: 19, 20
  • Motor 4: 21, 26

These are set by default in the pin selection area. To change them you will need to cut the small track on each solder jumper above the holes labelled 1A, 1B, 2A, 2B etc. Then wire in your choice of pins from the long row of holes above to the 4 holes on each side

Programming motors is easy using GPIO.ZERO


ZeroPoint – Analog Output for your Raspberry Pi

ZeroPoint – Analog Output

IMG_0286a

IMG_0292a


Overview

ZeroPoint is an analog gauge with a prototyping area for your own sensors

The gauge is a small stepper motor (X27.168) that is driven using an H-bridge (it’s a bipolar stepper so needs to be driven both ways)

Although it is a standard stepper motor to operate, it only travels through 315 degrees before hitting the physical end stops.

This gauge is used in many vehicles for speedometer, tachometer, etc. and so is in plentiful supply

It is a very weak stepper motor and cannot be used to drive much at all (cue someone trying to use two for a small robot!)

Power is taken from the 5V of the Raspberry Pi, so no additional power is required.


Software

We have a python library which can be used to position the needle accurately. You can download directly the library and example file by typing the following into the terminal window. Open LXTerminal and type:

  • wget http://4tronix.co.uk/zpoint.sh -O zpoint.sh
  • bash zpoint.sh

That will create a zeropoint folder in your home folder, with the library and example file:

  • zeropoint.py  library module for ZeroPoint
  • testPoint.py  a simple test script that allows you to set the position from 0 to 100% by pressing the number keys  (and ‘a’ for 100)
  • zeropoint.init ( ) – initialises the various settings and forces the pointer to zero
  • zeropoint.setTo (position) – sets the pointer to position (from 0 to 600)
  • zeropoint.stepToZero ( ) – forces the pointer to the zero position (oversteps to ensure this)
  • zeropoint.cleanup ( ) – closes down tidily, stopping the background stepper thread, shuts down the GPIO handler


Finally, there is a PDF file with a number of dial templates that could be used. Of course you can create your own with your specific measurement values on such as degrees Celsius/Fahrenheit  or humidity etc.

base3

Links


Using the Prototype Area

The prototyping area is intended for you to add you own sensors or input devices so you can create a standalone analog meter. These could be temperature sensors, light sensors, buttons, etc. To help you wire this in we’ve provided:

  • 6 spare GPIO signals (labelled with both BCM GPIO numbers and physical pin numbers)
  • I2C signals
  • Power lines: Ground, 3.3V and 5V (each has a column of 5 holes, all connected together)
  • There is then a bank of 8 x 6 non-dedicated holes for you to put in your own components. NB. 4 holes are missing in bottom right corner to allow space for the mounting hole, giving a total of 44 non-dedicated holes

PiStep2 Dual & Quad Stepper Controller for Raspberry Pi

PiStep2 Stepper Controllers for Raspberry Pi

PiStep2 is the new (May 2016) release of PiStep which has been a standard stepper motor controller for Raspberry Pi for a couple of years. PiStep2 changes the GPIO header to a 40 pin version, compatible with all Raspberry Pis since B+. This includes A+, B+, 2B, 3B and Zero.

In addition, the ULN2803, which is the Darlington driver chip, has been replaced by a surface mount version. This allows us to fit twice as many stepper motor channels on roughly the same area of PCB

To keep the cost similar to the older, 2-channel only PiStep, we offer a Dual version of the new PiStep as well as the quad version.

Purchase PiStep2 Here


Pistep2 Pinout

PiStep2 uses a single GPIO pin for each of the stepper drive outputs. There are 4 drivers per stepper motor, so a total of 16 GPIO pins are used.

  • MOTOR 1:  Physical pins 11, 12, 13, 15  (GPIO 17, 18, 27, 22)
  • MOTOR 2:  Physical pins 16, 18, 22, 7  (GPIO 23, 24, 25, 04)
  • MOTOR 3:  Physical pins 33, 32, 31, 29  (GPIO 13,12,6,5)
  • MOTOR 4:  Physical Pins 38, 37, 36, 35  (GPIO 20,26,16,19)


To drive the stepper motors you must change the pins that are enabled in a specific sequence – using either a 4-step or an 8-step sequence. You can reverse the sequence to make the stepper motors go the opposite way. See Matt from Raspberry Pi Spy’s excellent article here.


PiStep2 Jumper Settings

NB. PiStep2 v2.1 has the jumper settings marked incorrectly; Setting to the left (marked Vcc) is actually Vin, for voltage from 2-pin screw terminal. Setting to the right (marked Vin) is actually for using the 5V

Although you can have all four stepper motors connected to the Pi at the same time, it is unlikely that you can have them all moving simultaneously. This is because the total current required will exceed that available from the Pi. For this reason the Pistep2 (like the older PiStep) provides options to add extra power to the 5V line via the on-board micro-USB connector, or to add a completely separate power supply (up to 9V for standard “5V” stepper motors). The small jumper selects which power supply to use. If the jumper is to the right (nearest the micro-USB connector) then it will use the 5V on the board (which can be supplemented with external 5V into the USB), and if it is to the left then it will use the voltage supplied into the 2-pin screw terminal.


PiStep2 Example Software

There are 2 python examples that we provide. Both of these are based on Matt’s software from the link above.

  • stepper.py simply rotates a single stepper motor at a fixed speed. Edit the code to change to using a different motor
  • stepctrl.py places the main sequencing code into a separate thread and then uses keyboard input to select which motor, if any, is operating.

Placing the sequencing into a separate thread makes it possible for the stepper motor to carry on turning while the main program looks at sensors or user inputs to decide what to do next. I intend to create a simple library that allows the a separate thread to be easily created for each motor, enabling change of speed and direction very simply from the main program – not available yet however.


PlayHAT

PlayHAT – Learn While Playing on Raspberry Pi

Purchase PlayHAT here

PlayHAT is a ready-assembled educational learning board with 9 full-colour neopixel LEDs with 4 big coloured buttons and a beeper

It is a great way to start learning about use of GPIO in either Python or Scratch. It’s very easy to program; use the python library or broadcast the ScratchGPIO message to set the LEDs to the colours and brightness that you want. The buttons and beeper can also be read easily in your software – each button is represented by a separate input pin. Switch the pin high and the beeper will sound.

The LEDs are in a 3 x 3 Matrix allowing:

  • Randomising Dice
  • Traffic Light simulator
  • Simon game—remembering sequences)
  • Use the full matrix for cool flashing patterns!

ScratchGPIO already supports PlayHAT in the development version.

To drive the neopixels in Python you can install our demo files from the 4tronix PlayHAT GitHub

Using 4tronix Add-On Boards with Raspberry Pi Model B+

Model B+ Raspberry Pi Mounting Issues

14th July 2014

Click on any image to enlarge

bplus_compare

With the introduction today of the new Model B+ it is important to take note of the physical differences as well as the functional changes that have been made.

Purchase from here

The physical differences mean that some add-on boards and most (all?) existing cases cannot be used with the new Model B+

To see why this may be, let’s enumerate some of the various physical changes

  1. Both boards are the same nominal size at 56 x 86mm
  2. B+ has slightly rounded corners
  3. The Rev 2 mounting holes have been removed
  4. New 4 mounting holes (2.5mm diameter) are provided, 3.5mm from the edges. 2 are in the left corners and the other 2 are just to the left of the USB and Ethernet sockets
  5. The GPIO connector is now 40 ways, with the first 26 pins being identical to the existing Model B so add-on boards can plug into just the first 26-pins
  6. The GPIO connector has moved away from the left hand edge by about 6mm, to allow for the corner mounting hole
  7. The USB connectors (2 of them now) have moved inboard so they protrude much less. The rear of them is still less intrusive than the Ethernet socket, but many existing add-on boards will collide with the new positions
  8. Many smaller add-on boards relied on capacitor C2 to provide a support, by using a rubber bumper/foot on the bottom of the add-on board. C2 is no longer present
  9. The composite video and audio connectors have been removed and replaced a a single low-profile, slimline socket which has been squeezed in between the camera socket and the ethernet connector
  10. The micro-USB connector has moved around the corner and turned 90 degrees
  11. Activity and power LEDs have moved to near pin 1 of the GPIO connector (and now are edge-lit)
  12. The Ethernet LEDs have moved onto the ethernet connector itself.


The diagram below shows the placement of the various items on both boards that could affect the fit and placement of add-on boards with the red line showing a possible shape of PCB that would be compatible with both Model B and Model B+. Download a dimensional drawing from here. Note especially that you should bring the board outline in, immediately after pins 25 and 26 on the GPIO socket, so allowing access to the remaining 14 pins on the new connector.

outline02a


Existing 4tronix Add-On Boards

PiRoCon 1.2

As this board used the full area around the composite video socket and inside the USB and Ethernet sockets, it doesn’t fit directly onto the Model B+. However, it is simple to attach an extending GPIO header and an additional 12mm spacer so that the board can be used perfectly well on a Model B+

PiroconB+01 PiroconB+02

Although the support pillar cannot be screwed into the non-existent mounting hole on the Model B+, they have at least left this part of the board clear, so there is no problem with the support pillar resting on the Raspberry Pi. It is imperative that you use the support pillar for this larger board. When purchasing a PiRoCon, you can specify “B+ Mounting Kit” and receive the extended header and 12mm male-female spacer for an additional £0.50 +VAT.


MicRoCon and Pi-Step

Whilst these can be fitted directly to the Model B+, they both used the rubber bumper on to the capacitor C2 to support them. There is no equivalent support position on the B+, so they have to be left unsupported, which is not a big problem especially if the connections are made before plugging in. I would recommend that the rubber bumper be moved over the HDMI scoket (as shown in the second photo below), so it prevents any possibility of shorting out if the board is bent over a long way

microconB+01 microconB+02


PiDie and PiRingo

The PiDie board “just” fits inside the Ethernet socket on the B+, as you can see from the photo below. The PiRingo fits without any problems. The support pillars for both boards can be used as it touches part of the Raspberry Pi board with no components, but of course it can no longer be screwed into the Pi.

pidieB+02


IP Display Dongle and Adapter

There is no problem with this as it plugs directly onto the end of the GPIO connector. No changes required.

ipdisplayB+01


Initio Robot Chassis

The ABS moulding of course does not contain mounting holes for the new Model B+, but it can easily be adapted to fit using one of the offset spacers provided in every kit. There are several ways to fit the B+ onto the chassis, but the recommended position below allows the board to be supported in 4 corners, 2 of which have a screw in place. As with all boards mounted onto the chassis, you should remove the mounting positions that are not required so they don’t damage any components on the bottom of the Raspberry Pi board

initioB+01


IP Display Dongle

IP Display Dongle – Usage & Software

(Click on any image to enlarge)

ipd03

The IPDisp V1 is a 4-digit 7-segment LED display utilising a “retro” LED of the type found in 1970s calculators. This makes for a cute little display device that can be used to display anything you like that will fit in a 7-segment display. V2 uses a standard 7-segment display which is slightly larger. Both PCBs are the same size: 40 x 32mm (width x height).


You can purchase it here at 4tronix.


It was conceived as a device to help roboteers find the IP address of their robot so that they can connect to it via SSH or VNC for control purposes. Of course you can use a network scanner such as the excellent Fing, but that can become unwieldy in a corporate or educational establishment with a lot of connected devices. This unit is much more fun and can be setup to display the IP address directly on boot up.


IPDisp uses an I2C Port expander chip, the MCP23017, to address all the segments (anodes) as well as the individual common cathode digit drivers. The provided software, in Python, time-multiplexes the digits so that each digit is displayed for only 25% of the time.


Connecting the IP Display Dongle

The pinout is designed to match the I2C expansion socket on every 4tronix robotics controller board: PiRoCon, MicRoCon, Pi2Go and PGX. Simple select the type of header you want to use and solder it on. You may want it to lie flat, stand vertical, lie flat but higher up (extended header), etc. Then, making sure that you have it correct way round, plug it directly into the I2C expansion header. Here we show it plugged vertically into the I2C expansion connector on a MicRoCon controller board.

ipd01a

We also include female headers in the package, so you can plug into a male header, or use male-ended jumper wires to connect to your I2C pins. In fact, apart from the 5V connection, the layout of the pins matches the standard GPIO header on the Raspberry Pi, pins 1, 3, 5 and 7. So plug the header in to the pins as shown below, with the 5V pin hanging off the end. You then have 2 choices:

  1. Use a male-female jumper wire to connect the 5V on the IPDisp to Pin 2 on the GPIO header
  2. Solder across the last 2 pins (5V and “not connected”). This powers the IPDisp off the 3.3V from the Raspberry Pi. Although it “works”, it is not recommended except frr emergencies as it does use too much power for continuous use.

ipd02 Option 1

ipd04Option 2


Running the Software

Make sure that you have the I2C drivers enabled on your SD card. If not, follow this post by Raspi.TV

Download the python sample file and run it using sudo python ipd03.py:
$ cd ~
$ mkdir ipd
$ cd ipd
$ wget http://4tronix.co.uk/ipd/ipd03.py
$ sudo python ipd03.py

This will display the IP address and scroll it across the display a number of times, before quitting. If the Pi is not connected to a network, then it will display 0-0-0-0 and wait until the network is connected before displaying the correct IP address. As the continuous updating of the display is processor intensive, we don’t leave it running permanently.

The current version of the software will exit with an exception if the IPDisp is not connected. We didn’t bother to catch the exception as the information is what we need anyway.

Of course, this is not a lot of use  like this because we must already be connected, or running locally when running the application like this. It is much more useful to get the program to autostart when the Pi boots up. To do that follow the instructions to instigate a startup program when the desktop starts. (you can also put the code in the startup list, but we’ll do it like this for now)

Open LXterminal

$ cd ~    (back to home directory)
$ cd .config
$ mkdir autostart   (not required if it already exists)
$ cd autostart
$ sudo nano ipd.desktop

…and enter the following lines. Note that the Exec line needs to have the correct location for where you have put the program.

[Desktop Entry]
Encoding=UTF-8
Type=Application
Name=IPDisplay
Exec=sudo python /home/pi/ipd/ipd03.py
StartupNotify=false
Terminal=false
Hidden=false

Exit (ctrl-x) and save (y) then reboot. The IPDisplay will show the IP address of the Pi.


Simple Raspberry Pi Traffic Lights

Using Breadboard, LED & Resistors to Create a Traffic Light

Click on any image to enlarge

Fritzing Diagram

tl04

PiCard:

picard02


Assembling Hardware

Pop the PiCard pinout display over the GPIO pins on your Raspberry Pi ® making sure that pin 2 is in the corner of the board. This allows you to easily see where to plug the wires.

Push the LEDs and resistors (cut the legs shorter on the resistors first) into the breadboard as shown. LEDs have a positive and a negative leg. Positive leg on the right above is longer. Make sure you plug them in the correct way round or they will not work.

  • Connect resistor on Red LED to pin 7
  • Connect resistor on Amber LED to pin 11
  • Connect resistor on Green LED to pin 13
  • Connect negative leg of Red LED to pin 6
  • Connect negative leg of Amber LED to pin 14
  • Connect negative leg of Green LED to pin20
  • Connect one side of switch to pin 22
  • Connect other side of switch to pin 25


Completed Traffic Lights

tl03b


Programming

To light the LEDs you need to make the corresponding GPIO pin High. Make the pin low to turn off the light.

  • Red is on pin 7
  • Amber is on pin 11
  • Green is on pin 13

To read the switch you need to read on pin 22. A High value (‘1’) when the switch is up (not pressed) and a Low value (‘0’) when the switch is pressed.


Python Examples

Download the example code from here and place it in your home directory on the Raspberry Pi.Then you can run it by typing:

sudo python TrafficKit01.py

This will light the LEDs in the well know traffic light sequence. Now try to edit the code to make it do something different.

You can download the second demo example from here and run it with:

sudo python TrafficKit02.py

This will light the LEDs in sequence but will also check the button occasionally and force it to the Red if the button is pressed


ScratchGPIO Examples

You will need to first install ScratchGPIO if you haven’t already. Go to SimpleSi’s page

Within ScratchGPIO you can switch the Red LED on with

Switch it off again with

Similarly you can use the other pins for the Yellow and Green LEDs. A complete Traffic Light Sequence is shown here:

traffic

You can download this from here


Adding Shroud to Extended Headers

step05

Why?

Extended headers on Raspberry Pi addon boards are a boon as they allow you to connect additional wires, or even another addon board in some situations. The problem is they tend to be relatively weak and can get bent over easily. Also, it is easy to plug things onto the extension shifted left or right by one or two positions – potentially causing catastrophic failures.

Simon Walters @cymplecy came up with the idea of adding a shroud around the extended header pins. This post shows you how to do it.


How?

Step 1

Take a Raspberry Pi. Any Pi

step01


Step 2

Plug on an Add-On board with extended headers. Here we are using the popular 4tronix PiDie 🙂

step02


Step 3

Take a standard male 26-pin male box header

step03


Step 4

Use a small pair of pliers to pull out all the pins. Pull them from the top upwards.

step04


Step 5

Push the plastic box header shroud onto the PiDie’s extended header pins. Make sure it is pushed all the way down

step05


Step 6

Now you can safely use the extended header pins. Here we plug on a PiGlow from Pimoroni as that uses different GPIO pins (I2C) than the PiDie

step06


Caveat: With the box header I used, it is still possible to put the PiGlow in one pin to the left or right. Maybe there are box headers with less space at either side. However, at least it protects the pins and makes it much more obvious that the extra board is connected wrongly.