

The Bit:Commander is a great device for powering and experimenting with the BBC micro:bit.
Purchase Bit:Commander here
Makecode Extension for Bit:Commander
In Makecode, select Extensions. Then search for BitCommander and add the extension
Overview
As well as a battery pack (3 x AA batteries required), the Bit:Commander includes
- Edge Connector for easy connection of the BBC micro:bit
- Robust on/off switch
- Blue power indicator
- 6 multi-colour RGB LEDs (aka neopixels)
- 4 square 12mm push buttons with coloured caps (Red. Yellow, Green, Blue)
- Analog dial input with centre click detent for easy centreing
- Analog Joystick with X and Y movement and a push switch
- Powered miniature speaker
Suggested uses:
- Acting as a remote control for another micro:bit device, such as a Bit:Bot
- Acting as a self-contained portable (no wires) games console
- Experimenting with various Digital and Analog inputs available as well as the speaker and neopixel outputs
- Everything is pre-fitted. No wires, soldering or jumpoers to fiddle with
Pin Connections:
- Speaker: Pin 0 (*)
- Dial: Pin 0 (*)
- Joystick X: Pin 1
- Joystick Y: Pin 2
- Joystick button: Pin 8
- FireLeds: Pin 13
- Red Button: Pin 12
- Yellow Button: Pin 16
- Green Button: Pin 14
- Blue Button: Pin 15
(*) Pin 0 is used both for Speaker output (using the Music or Tone output methods) as well as the Dial analog input. This causes some compromises – most notable of which is that the Dial analog input cannot reach its normal maximum value of 1023 and stops at around 850 instead. As long as the software understands this, then it shouldn’t be a problem.
NB. The Bit:Commander is only powered if batteries are fitted and it is switched on. Powering the micro:bit does not power the Bit:Commander. However, when the Bit:Commander is powered up, then it will also power the micro:bit
Using to Control Floor Robots with Makecode
(For example: BitBot XL, BitBot PRO, MiniBit, RoboBit or MARS Rover)
You can download these programs from here:
- Transmitter (for BitCommander)
- Receiver (for BitBot XL)
You should consider that the BitCommander is really just a holder for a Microbit. It contains switches, a joystick etc. that the Microbit can read and do whatever it wants with. When using to control a second Microbit in a floor robot, we read the inputs that we are interested in, then use the Microbit Radio blocks to send the commands we want to the robot. The robot will have another program running that receives the commands and executes them as required.
So we need to first write a program to run on the Microbit in the BitCommander. This program will read some switches and send related commands to the robot, using the Microbit Radio blocks. Here’s a simple program that uses the coloured buttons and the button in the joystick. We will use Radio Channel 7 for this example (and make sure our robot is also using Channel 7). We’re using a simple numeric code to send the commands:
- Forward (Red)
- Left (Yellow)
- Reverse (Green)
- Right (Blue)
- Stop (Joystick button)
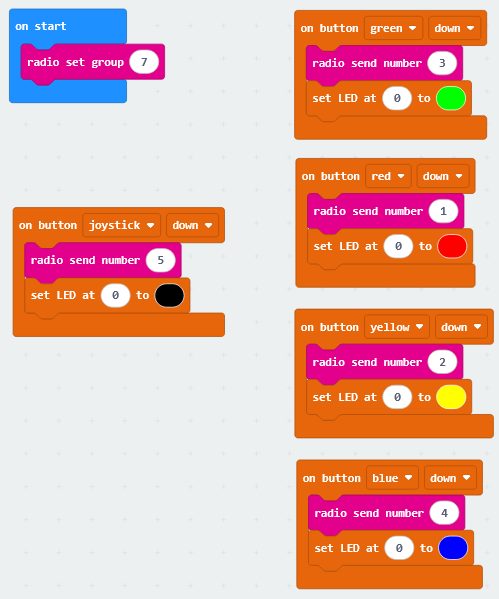
Select the “on button…” and “set LED…” blocks from the BitCommander extension. Select the “radio send…” blocks from the Microbit Radio section.
Install this program in the BitCommander Microbit
Now let’s create a simple program for the robot (we will use the BitBot XL, but you can write a similar program for other robots). So make sure you have installed the BitBot extension first.
Again we will start by setting the Radio group to match that in the BitCommander. Note that you can have several pairs operating at the same time as long as each pair of BitCommander and Robot, uses different Radio groups (channels).
Then we listen for Radio messages and send the appropriate command to the motors.
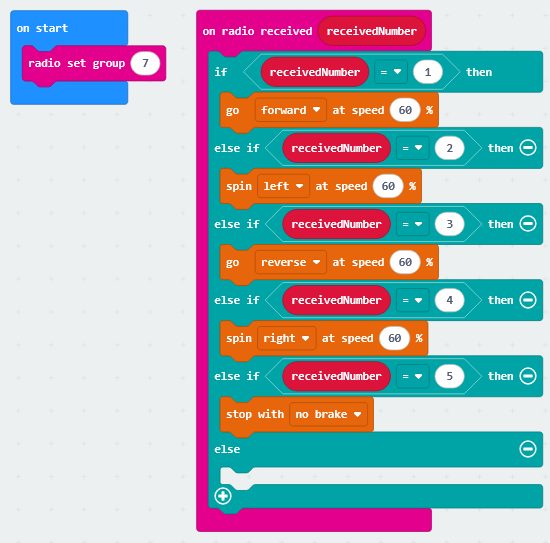
Now download this to the Microbit in your BitBot and you should be able to control it via the BitCommander.
Resources:
From the excellent Mark at multiwingspan:
JavaScript Blocks
- Bit:Commander Blocks Overview: http://www.multiwingspan.co.uk/micro.php?page=bcpxtintro
- The Joystick: http://www.multiwingspan.co.uk/micro.php?page=bcpxtjoy
- The FireLeds: http://www.multiwingspan.co.uk/micro.php?page=bcpxtneo
- The Potentiometer: http://www.multiwingspan.co.uk/micro.php?page=bcpxtpot
- The Pushbuttons: http://www.multiwingspan.co.uk/micro.php?page=bcpxtbtn
- The Buzzer: http://www.multiwingspan.co.uk/micro.php?page=bcpxtbuzz
- Simon Game: http://www.multiwingspan.co.uk/micro.php?page=bcpxtsimon
MicroPython
Note that these examples are targetted at the Classic BitBot and will need changing for use on the BitBot XL and BitBot PRO
Bit:Commander uPython Overview: http://www.multiwingspan.co.uk/micro.php?page=bcintro
The Joystick: http://www.multiwingspan.co.uk/micro.php?page=bcjoy
The Neopixels: http://www.multiwingspan.co.uk/micro.php?page=bcneo
The Potentiometer: http://www.multiwingspan.co.uk/micro.php?page=bcpot
The Pushbuttons: http://www.multiwingspan.co.uk/micro.php?page=bcbtn
The Buzzer: http://www.multiwingspan.co.uk/micro.php?page=bcbuzz
Evasion Game: http://www.multiwingspan.co.uk/micro.php?page=bcchase
Lights Out Game: http://www.multiwingspan.co.uk/micro.php?page=bclights
Simon Game: http://www.multiwingspan.co.uk/micro.php?page=bcsimon
Bit:Bot/Robot Controller: http://www.multiwingspan.co.uk/micro.php?page=bcbitbot
Text Entry: http://www.multiwingspan.co.uk/micro.php?page=bctext
Unicorn Commander: http://www.multiwingspan.co.uk/micro.php?page=bcunic
- Use to control Bit:Bot. Install the TX program on Bit:Commander and the RX program on Bit:Bot
- Simple Space Invaders game