Music:Box with Blinkie Plugins
The music box is a small board that makes your BBC micro:bit totally mobile with blinky LED plugins and on-board powered speaker
Purchase here
Specification:
- 3xAAA battery holder
- Robust on/off switch
- Blue indicator LED
- Mini speaker with powered driver
- Fittings for BBC micro:bit (version from v1.0 onwards have edge connector instead of pillars and screws. No functional change to the operation however)
- Connector for neopixel plugins
Making Music
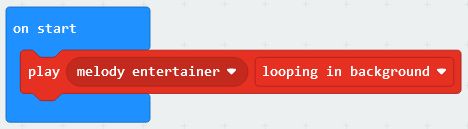
The powered speaker is connected to Pin 0 of the Micro:Bit. This is the default pin for the music modules in micropython and Makecode
So in Makecode, you could simply create this block to run once at the start. From the “Advanced melody” section of the Music group, select the “Play” block:

In micropython, you can do the same thing with the following code:
from microbit import *
import music
music.play(music.ENTERTAINER)
You can make your own music or use one of the built-in tunes. You can also play the tune in the background, so you can be doing other things while the music is playing. To play forever in the background:
with Makecode
with micropython
from microbit import *
import music
music.play(music.ENTERTAINER, wait=False, loop=True)
More micropython help can be found here
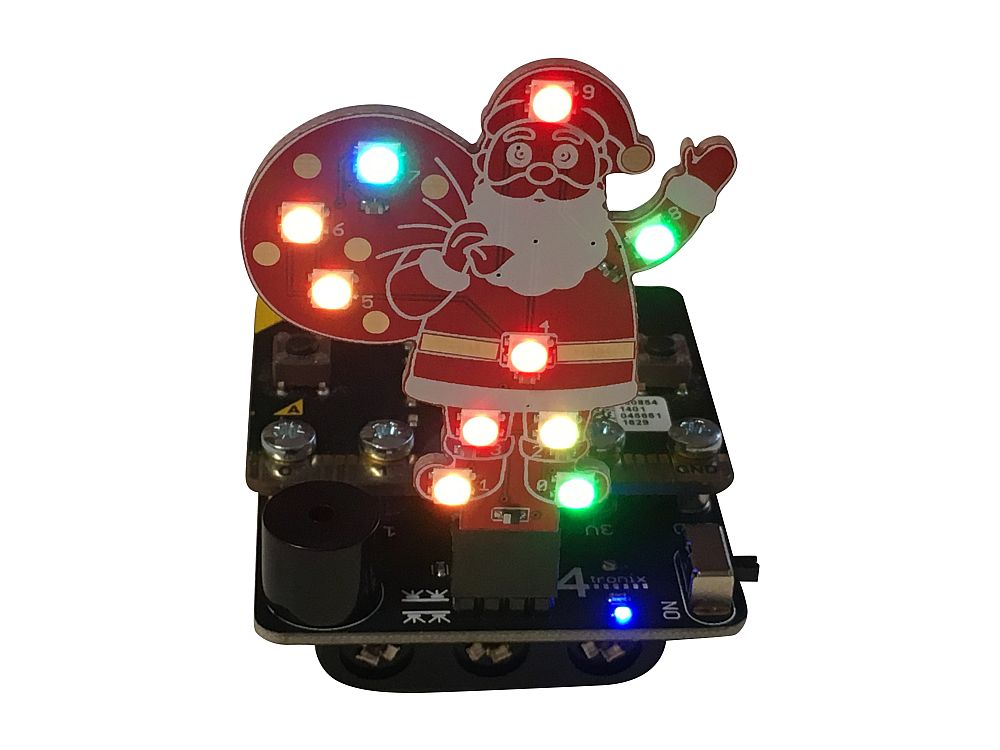
Flashing the Neopixels
At the front of the Music Box there are 2 rows of 4 pins, with symbols next to them indicating “facing forward” and “facing backwards”. The outer 2 pins of each 4 are power and ground and the inner two pins are Data in and data out.
The row of pins nearest the edge of the board (facing outward) are the first neopixels in the chain. The data out from these, goes to the data in of the 4 pins facing into the board. This means you can put one plugin facing outwards and one facing inwards. The plugin facing inwards would start at LED10 (assuming a standard 10 neopixel plugin is in the first position).
If you only have an inward facing plugin, you must link the data in and data out of the outward facing pins. This is why there is a little back jumper included. If you only have a plugin facing outward, then you don’t need the little jumper, but you can keep it safe by plugging it into the inward facing pins.
Phew!
On the Music:Box the neopixels are connected to the MicroBit pin 1, so remember to select Pin 1 in the following code examples
Plug your selected plugin (Santa, Snowman or Christmas tree for now) into the 4 pins nearest the edge of the board. the LED marked 0 at the bottom is the first LED in the chain of neopixels.
Now you can use the standard neopixel modules in your selected MicroBit language.
For Makecode, you can do this to set all the pixels to Red when the A button is pressed

NB: The neopixels are on Pin 1 and they use GRB format (as shown in the example above)
Don’t forget to include the ‘show’ block after you have changed the pixel colours. It doesn’t actually update the pixels themselves until you do. You will also find that the LEDs will light up even if the Music:Box is not switched on. However, the colours won’t be correct and it will generally be quite dim. Always switch on the Music:Box when testing LEDs.
For micropython, you can do something like this:
from microbit import *
import neopixel
np = neopixel.NeoPixel(pin1, 10)
np[0] = (50,60,100) # set R,G,B values of pixel 0
np.show()
Again, you must run the show method after setting pixel values and ensure that the Music;Box is turned on. More micropython help can be found here
Examples
- MusicBox.py This micropython program randomly flashes the neopixels and plays your choice of tune when A button is pressed. Stops when B button is pressed. You can hear glitches in the music when the neopixels are being update
- NoteSynch.py this micropython works in a similar way to MusicBox.py, but it plays each note individually and then updates the neopixels. This synchronises the music with the light show and also removes the glitches in the music