Using Cube:Bit with Raspberry Pi
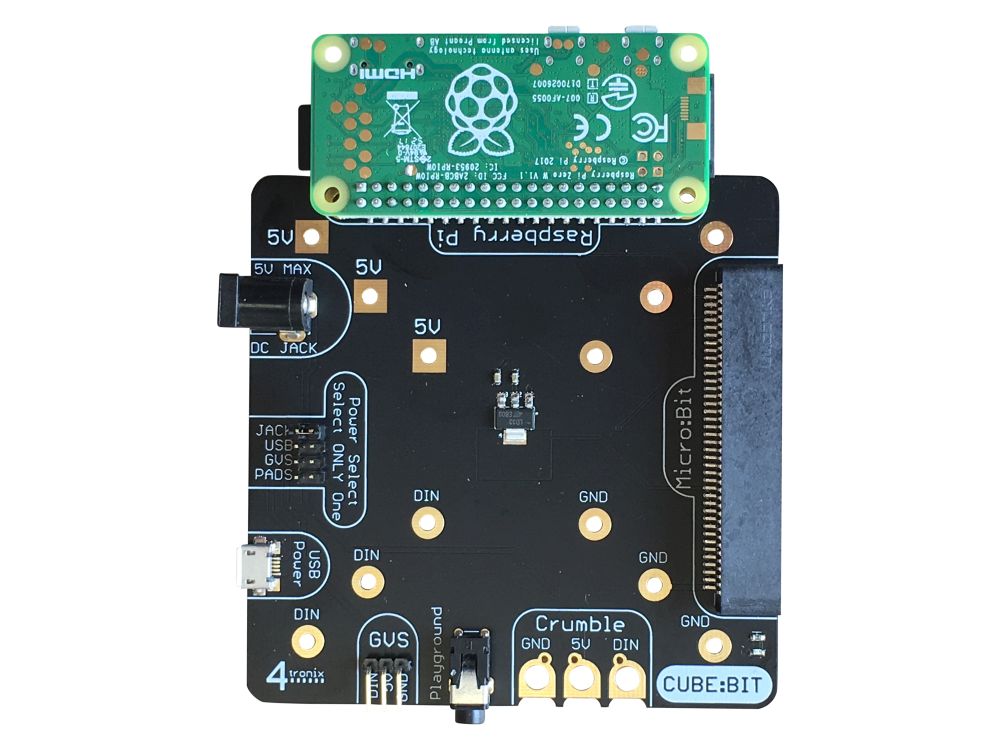
Attaching the Raspberry Pi
The Cube:Bit is a 3D array of neo-pixels (SK6812-3535 to be precise). As such it can be accessed like any other strip, ring or matrix of neopixels using WS2812B compaible code.
The base for the Cube:Bit (available separately) contains a 40-pin GPIO connector, into which a Raspberry Pi Zero can be connected directly. “Full size” raspberry Pis can be connected using a ribbon cable.
The 5V supply provided to the Cube:Bit base is also passed to the Raspberry Pi to power it, so no additional power is required.
Only BCM18 (physical pin 12) is used from the Raspberry Pi. This is the PWM pin that all neopixel code uses to communicate, so all existing code will work without changes.
Note: There is a power input selection jumper on the Cube:Bit base. Ensure the jumper is in the correct place for your power supply (usually USB or DC Jack)
Adding the Neopixel Driver to the SD Card
If you have already used neopixels on your Raspberry Pi with the SD card you are using, then you don’t need to do anything here. Your existing code will work, although you would get strange shapes due to the layout of the individual LEDs in the Cube:Bit.
If you haven’t already installed the driver then there are a number of ways to do it. I find the easiest and reliable way is to run Pimoroni’s curl script from here: https://github.com/pimoroni/unicorn-hat Ensure your Raspberry Pi is connected to the internet and then type:
\curl -sS https://get.pimoroni.com/unicornhat | bash
You do not need to install the unicorn hat examples (although having a Unicorn Hat and using the examples is an excellent idea!)
This has now added the rpi_ws281x driver for neopixels. This driver is used by the Cube:Bit library
Adding the Cube:Bit Library and Examples
The cubebit.py library module is a layer over the rpi_ws281x driver library that implements functions specific to the Cube:Bit, such as mapping x, y, z co-ordinates to specific pixels, writing to defined planes, etc.
Although not strictly necessary (you could write your code to talk directly to the rpi_ws281x driver), it does allow code from the Microbit using the Makecode package to be easily ported to Raspberry Pi as many of the same library calls are implemented in the same or similar ways.
Again, with your Raspberry Pi connected to the internet, run the following commands to download the cubebit.py library and example code
wget http://4tronix.co.uk/cb.sh
bash cb.sh
This has now created a cubebit folder on your Raspberry Pi which contains the cubebit.py library and a number of example programs.
NB. For all these examples you should change the variable side to be the number of pixels per side on your Cube (eg. 3, 4, 5 or 8). This is always set near the top of the program. side = 5
You will need sudo access to run these, so for example: sudo python purpleRain.py
Type Ctrl-C to exit these demos.
- test.py shows a rainbow on all pixels for 50 seconds, then starts stepping through each x,y,z value with a single yellow-ish pixel
- purpleRain.py shows a cloud of purple pixels on the top layer, then flashes white (lightning), then the raindrops fall randomly and collect in a pool at the bottom. Finally, the “water” is recycled via one edge back to the top
- planeTest.py moves a plane of randomly coloured pixels through the Cube:Bit in each direction repeatedly