McRoboFace – Emoticon for Electronic Creations

(Click on any image to enlarge)
Purchase McRoboFace Here
Overview
The McRoboFace is a robotic face with 17 individually controllable RGB LEDs that you can use to bring your electronic creations to life.
Each LED can be set to any of 16 million different colours (256 for each of Red, Green and Blue).
All the LEDs as fully compatible with the “standard” WS2812, also known as “neopixels” – a name coined by Adafruit. As such, any of the many libraries and examples for most of the common controllers can be used to drive them. This includes:
- Crumble
- Arduino
- micro:bit
- ESP8266
- Raspberry Pi
- Codebug
- BeagleBone
Tour of the ‘Face
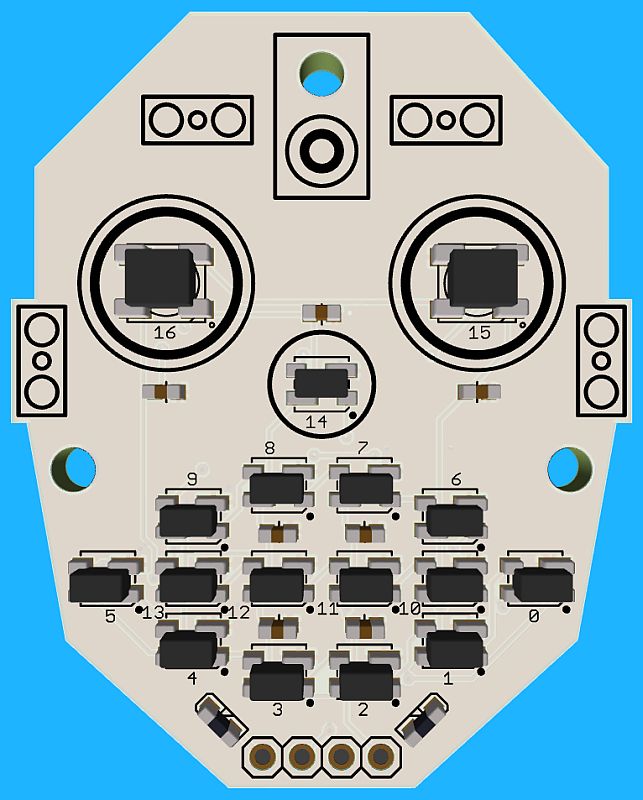
The “mouth” is made up of 14 small (3.5mm) pixels numbered in small lettering from 0 to 13:
- Lighting 0 to 5 gives a smile
- Lighting 0, 5, 6, 7, 8, 9 gives a frown
- Lighting 0, 5, 10, 11, 12, 13 gives a straight-line
- Use other combinations for quizzical looks, open mouth, etc
The “nose” comprises a small (3.5mm) pixel numbered 14
The “eyes” comprise two standard (5mm) pixels numbered 15 & 16

The rear shows the 3 mounting holes, each is 2.8mm diameter for use with M2.5 screws
There are 4 connections at the bottom:
- Gnd – Ground pin. Connect to 0V from your controller
- Vcc – Power pin. Connect to the power pin from your controller.Ideally this is 5V, but on the micro:bit for instance only 3.3V is available. This will work, although it is below the recommended minimum voltage
- Din – Data input pin. Connect this to the control output from your controller
- Dout – Data Output pin. Use this to connect additional smart pixels such as another McRoboFace, a CodeBug GlowStar/GlowBug, Crumble Sparkles or an Adafruit neopixel strip etc.
Connections to Example Controllers
For the following photos I have soldered on the 4-pin right angle header to make connections easier using jumper leads. Photos are of a prototype McRoboFace, without the numbers to identify each pixel
Crumble

The Crumble knows smart pixels as Sparkles and they must be connected to the D pin. Use the + and – pins to provide Power and Ground
The software is as simple as setting each pixel to the required colour. This is what the picture above is running:

Arduino

For the Arduino, any of the output pins will work. In this example we are using A0 as it is closest to the %V and Ground pins.
The code used relies on the well-known and well supported FastLED library. In the Arduino IDE, go to Sketch / Include library / Manage Libraries and then search for FastLED. Select it and install.
Then you can use this example code to show various facial expressions. The important parts are:
- in setup ( ) – you need to define the number of LEDs, and the pin to be used to control them: FastLED.addLeds<WS2812B, DATA_PIN, RGB>(leds, NUM_LEDS);
- to change any pixel, set its RGB value in the led array, eg. leds [3] = CRGB (RedValue, GreenValue, BlueValue); When you have set all the pixels you need, then call FastLED.show ( ); to transfer the changes to the pixels.
micro:bit

In micro python on the micro:bit, you can use any output pin to control the McRoboFace’s pixels. In this example we’re using Pin 0
As with the Arduino, you first need to include the right library and then define which pin you’ll be using and how many pixels are required. micro:bit calls them “neopixels”

Raspberry Pi
You can do this in two ways:
- Connect directly to GPIO pin and install some software. This software often changes as Raspberry Pi change things in the kernel and will need keeping up to date
- Use Picon Zero to provide a simple interface to all your devices including smart pixels
Directly to GPIO Pin

You need to use GPIO 18, which is physical pin 12. You can use the 5V and Ground pins directly. No level changers are required as the pixel can be controlled using 3.3V quite happily as shown.
If you already have neopixels supported on your Pi then there is no need for the build and install steps below. You can visit McRoboFace githib repo for the information below
$ git clone https://github.com/4tronix/mcroboface
$ cd ~/mcroboface
$ sudo apt-get install python-pip python-dev
$ sudo python setup.py install
NB. For Raspbian Jessie release 10th May 2016 (and probably later versions also) you will need to add the following lines in ‘/boot/config.txt’ :
hdmi_force_hotplug=1
hdmi_force_edid_audio=1
This will create a folder on your Pi called mcroboface and provide a simple example, mcroboface.py. Run this as:
$ sudo python mcroboface.py
Using the 4tronix Picon Zero

Picon Zero output 5 can be used to drive smart pixels in a very simple manner. You should first visit the main Picon Zero page to download the library
Download the simple test example from here
Singalong Kit for McRoboFace

The Kickstarter campaign for McRoboFace included an option for some electronics that allowed the mouth of McRoboFace to be controlled by an audio input signal.
This was developed by Robin Newman and the full blog can be seen here
Download the assembly instructions here