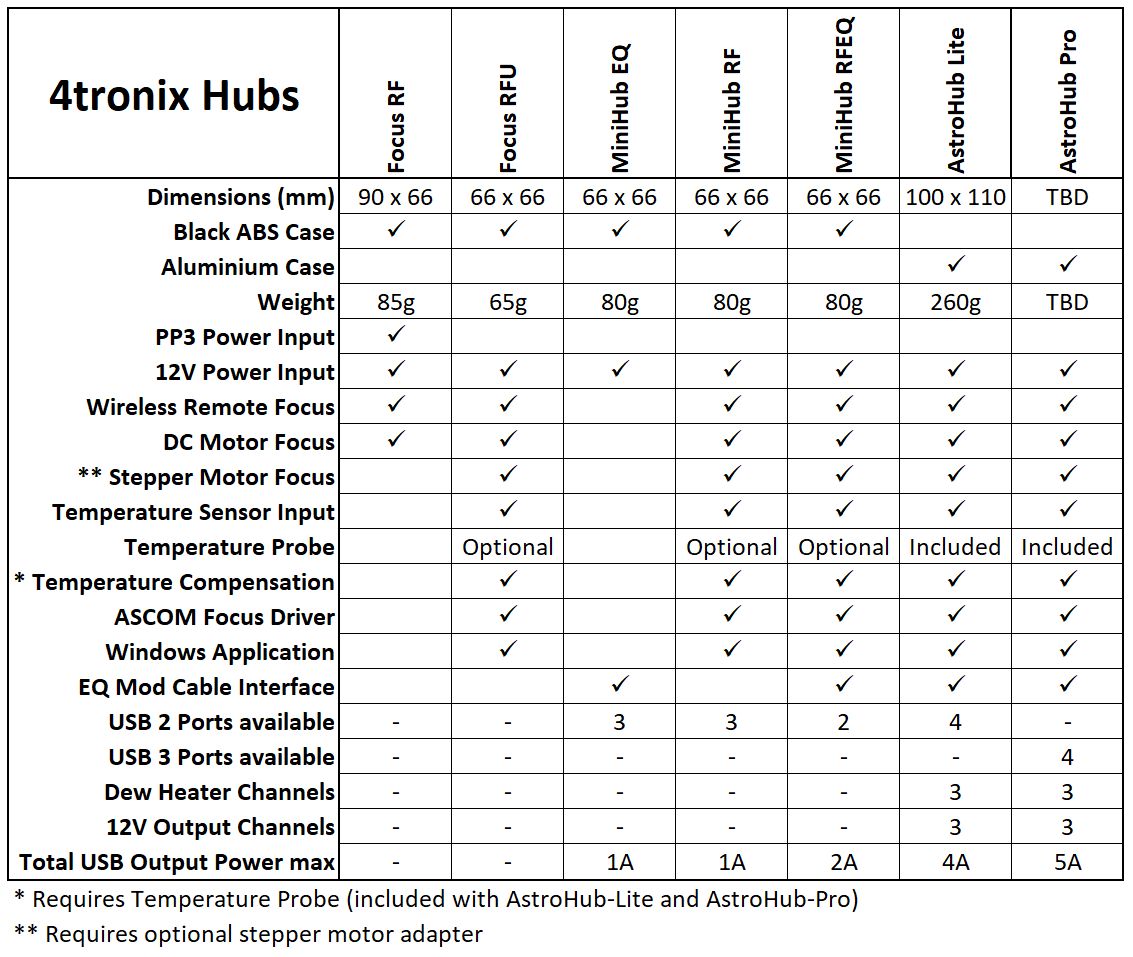
A selection of USB and Power hubs useful for astrophotography
Budget electronics by astronomers, for astronomers
Purchase >Here<
Downloads
These applications and drivers are not digitally signed, so you will have to approve them for installing
- AstroHub PC application 1.0.6 <download>
- ASCOM Driver 1.1.4 <download>
- AstroHub Software User Guide PDF <download>
- EQMod / ASCOM Driver setup guide PDF <download>
- CH340 driver (may be needed if device not shown in Device Manager) <download>
Application History
- 1.0.6 Fixed bug not storing Bipolar stepper mode. Added reversing of motors for focuser
- 1.0.5 Initial bug fixes
- 1.0.4 First Release version
- 1.0.3 Initial “Working” Release
ASCOM Driver History
- 1.1.4 Fixed bug with negative temoperature readings
- 1.1.3 Fixed bug with Absolute mode setting incorrect values
- 1.1.2 Initial “Working” Release
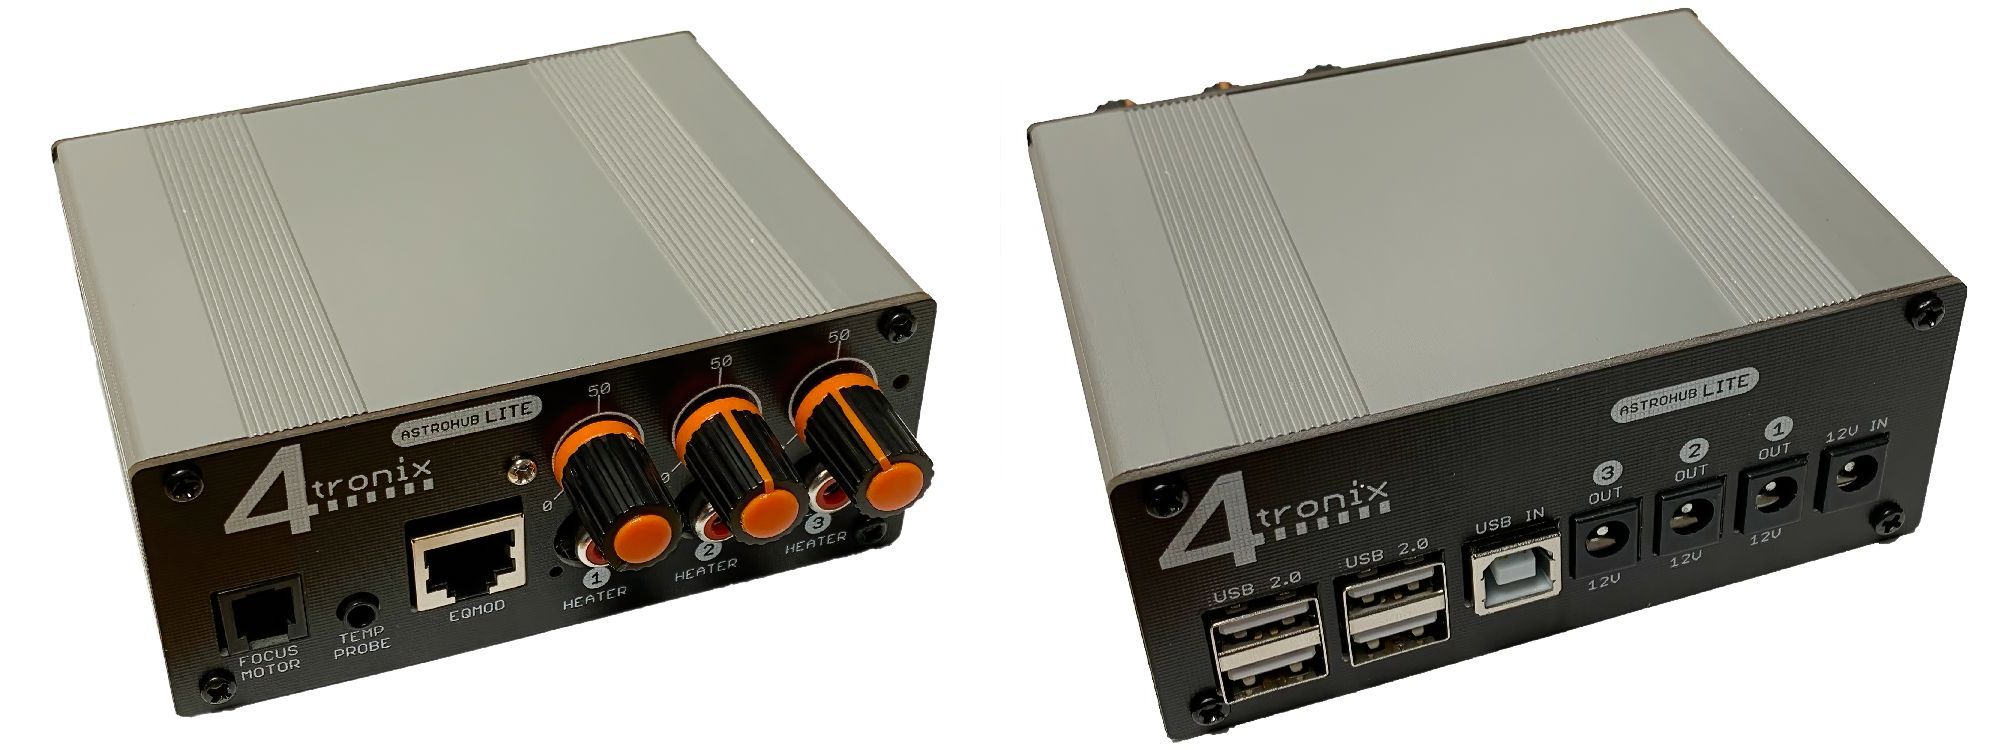
Product Overview
There are a number of products in the range that can be controlled and/or monitored using the AStroHub application software.
Each product comprises a selection of standard building blocks, so you can select the one in the range that has the appropriate set of blocks for your equipment.
These building blocks are:
- USB hub with various quantity, power output and type of USB connections
- Focus motor control. DC motors and stepper motors
- Temperature monitoring with optional temperature probe and focus temperature compensation
- Dew heater controllers: controlled, monitored, protected
- 12V DC outputs: controlled, monitored, protected
- EQMod direct connection for many SkyWatcher (and Orion) mounts
Focuser Motor Control
The same focus motor control is used for all products, except the Focus RF (which doesn’t have a connection to the application).
Remote Controller
For Focus RF, the remote controller uses buttons 1, 3, 5 and 7 to move the motor one way; and buttons 2, 4, 6 and 8 to move it the other way. Buttons 1 and 2 are the slowest and buttons 7 and 8 are full speed. You can set the slowest speed so that it works on your rig. See the Focus RF blog for more details.
For Focus RFU, MiniHubs and AstroHubs the remote has two different modes of operation:
- Continuous. If Button 7 is pressed then continuous mode is selected. Here the buttons 1 to 6 work in the same was as for Focus RF – while the button is held pressed the motor will continue to run (*). Buttons 1, 2 are slowest and buttons 5,6 are fastest. The speeds can be set using the Windows app
- Step mode. If button 8 is pressed then stepping mode is selected. Pressing buttons 1 or 2 will move one “stride”, pressing 3 or 4 will move 5 “strides” and pressing 5 or 6 will move 25 “strides”. Each “stride” can be set to a number of steps from 1 upwards, by using the Windows app. This step mode allows changes via the remote control to be fed back to the Windows app, or ASCOM driver so that the absolute or relative position of the focuser is reported.
- (*) Continuous movement of the motor will stop if a command is sent to the unit over USB. The USB commands will take precedence over the remote controller. You can set the scan rate if using the Windows app so it doesn’t interrupt too often.
Selecting DC or Stepper Motors
All except Focus RF can support stepper motors (both Unipolar and Bipolar) as well as DC motors. Everything is configured for DC motors when shipped, so you will need to change this using the Windows app if you want to use stepper motors.
There are two parts to operating stepper motors. Firstly, you need to wire up the motor correctly either by making a cable, or by using the optional focus motor adapter. Secondly, you need to set the stepper motor characteristics in the software – either via the ASCOM setup dialog, or from the Windows app, depending which you are using.
Wiring Motors
In this section we will use the Focus Motor Adapter PCB as shown below. You will need an RJ22 cable to connect from the Focus RFU, MiniHub or AstroHub to the adapter.
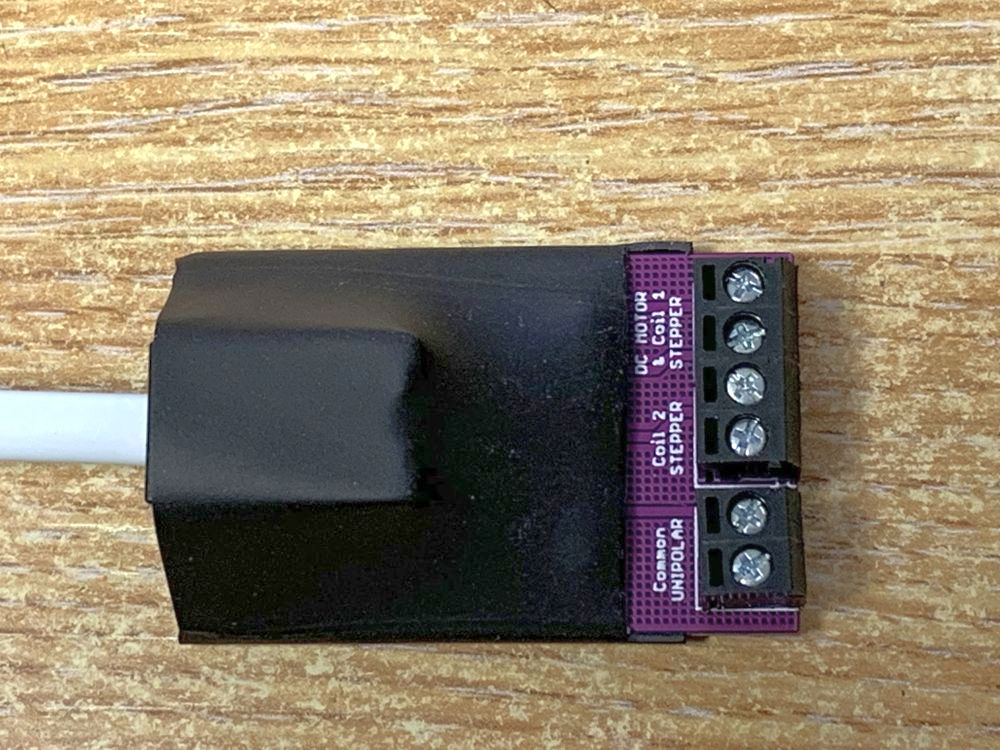
- DC Motors: Use the top two connections labelled “DC Motor & Coil 1”
- Bipolar (4-wire) Stepper Motors: Use the top 2 connectors for coil 1 and the next 2 for coil 2
- Unipolar (5-wire) Stepper Motors: Use the top 2 connectors for coil 1 and the next 2 for coil 2. Then use either of the bottom connectors for the common/power wire.
- For all stepper motors, you may have to experiment with the polarity of each coil before it operates as expected. Every motor is different, but they all need their coils to be energised in the correct sequence and the correct polarity
Setting in Software
In the Windows app or the ASCOM driver setup dialog, you can select the type of motor you are using (DC, Bipolar or Unipolar).
For stepper motors you can also set the step delay in ms. This is the delay between each step of the sequence and again will vary from motor to motor. You should set it to a slow value (say 10 – 20 ms) to begin with until you are sure you have the wiring connected correctly. Then speed it up until the motor runs smoothly. Probably around 2 – 5 ms.