Servo:Bit Multi-Servo Driver
Purchase Servo:Bit here
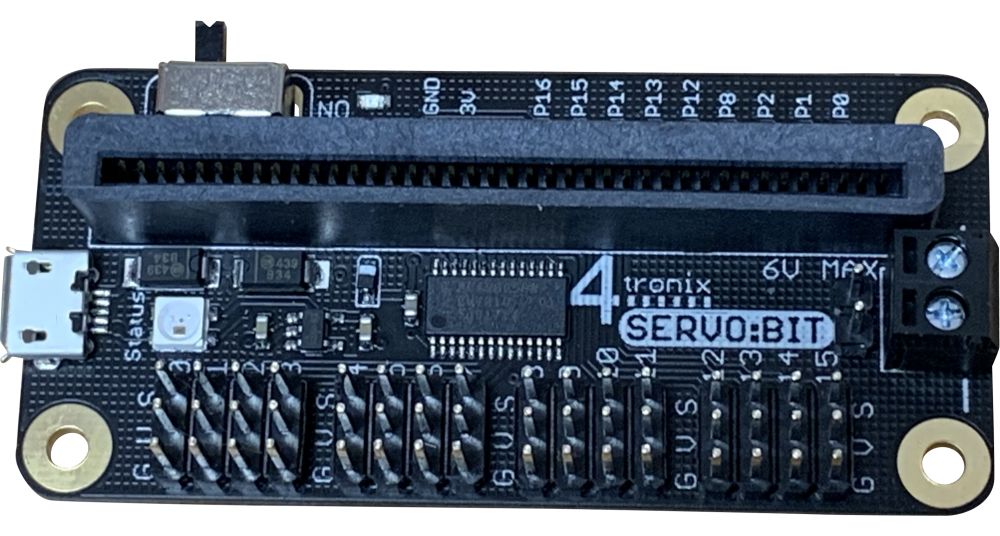
Servo:Bit is a little board, exactly the same size as a Raspberry Pi Zero and the 4tronix Drive:Bit, which provides control for up to 16 servos. Access to the useful pins of the Microbit is provided as is a single Smart RGB LED
Power for the servos is provided by one of three options:
- USB connector
- 2-pin male header
- 2-way screw connector
Providing power (5V – 6V) to one of these connectors also provides power for the Microbit.
Connections
NB: Fit the Microbit into the connector with the LEDs on the Microbit facing the switch and indicator LED.
Voltage
Most hobby servos operate within 5V to 6V range. Ensure that the voltage you provide does not exceed the voltage supported by your servo. Unless you have a specialist servo, you should be safe with the 5V USB input
Current Draw
Running 16 servos will consume a fair amount of current. Check the specification of your servos to see how much current they may take and ensure your power supply can provide sufficient. For instance, 16 servos taking 100mA each may require up to 1.6A this may not be available from your USB power supply.
You can connect both USB power and one of 2-pin male header or 2-way screw terminal to power at the same time as there are blocking diodes to prevent back-current. Do NOT connect power to both the 2-pin male header and the 2-way screw terminal as there is no blocking diode between these two. Use one or the other, but not both.
Each servo output is provided with 3 connections using the GVS (Ground, Volts, Signal) layout common to servo cables. Ensure you plug them in the correct way round or your servo may be damaged. Brown or Black is the normal colour for the Ground lead and this should be connected nearest to the pins near the edge of the board labelled ‘G’. The signal wire is likely to be White, Yellow or Orange and this should be on the pins labelled ‘S’
The Microbit can power the Smart RGB LED and the blue LED on the board, but it cannot power and is not connected to the servos. Your servos will not operate unless you connect power into the USB, 2-pin header or 2-way screw terminal.
Programming the ServoBit in Microsoft Makecode
There is a Makecode extension available to control the servos and Smart RGB LED on the ServoBit. Go into the Advanced tab in Makecode (or click on the gear icon in top right) then select Extensions. Enter ServoBit in the search box and select it.
The 4tronix ServoBit uses a PCA9685 to control 16 independent servos.
Helper commands are available to centre all servos, or set individual servos to any angle from -90 to +90 degrees
It is also possible to set the speed at which each servo moves to its new position, which gives a smoother operation
In addition, the 4tronix ServoBit contains a single Smart RGB status LED which can be set to any colour and brightness and a flashing function is also available.
Setting the servos
Set all 16 servos to the centre position

ServoBit.centreServos()
Set a specified servo to an angle, between -90 and +90 degrees

eg. Set Servo 5 to +30 degrees
ServoBit.setServo(5, 30)
Controlling servo movements and speeds
You can control the number of degrees per second that the servo moves. A typical servo would have a maximum speed of around 500 degrees per second.
Reasonable values for slower movements are between 30 and 200 degrees per second, although a range of 1 to 1000 is supported.
Setting the servo position whilst it is still moving, will cancel the movement command.
Creating a new movement command for a servo with an existing movement will cancel the first and then start the second.
You can also check if the servo has reached its target position, or wait until it has completed.
Move specified servo to an angle at a specified speed (speed can be from 1 degree per second to 1000 degrees per second)

eg. Move servo 5 to 30 degrees at 40 degrees per second
ServoBit.moveServo(5, 30, 40)
Check current position of specified servo
![]()
eg. Check current actual position of servo 5
let variable = ServoBit.getServoActual (5)
Check target positon for servo
![]()
eg. Check target positon for servo 5
let variable = ServoBit.getServoTarget (5)
Wait for specified servo to complete its movement

eg. Wait for servo 5 to complete its movement
ServoBit.waitServo (5)
Smart RGB LED helpers
The 4tronix ServoBit has a single smart RGB LED (aka neopixel) fitted. There are various blocks available to make it easy to control the LED
Clear the LED (turn it Off)
![]()
ServoBit.ledClear()
Set LED to selected colour. You can use other blocks to generate your own RGB colours

eg. Set LED to Red
ServoBit.setLedColor(ServoBit.vColours(vColors.Red))
Set brightness of LED from 0 to 255. Default value is 40

ServoBit.ledBrightness(40)
Start Flashing the LED with selected colour and defined speed

eg. Start Flashing the LED with Green at 100ms
ServoBit.startFlash(ServoBit.vColours(vColors.Green), 100)
Stop flashing the LED

ServoBit.stopFlash()