Pi2Go Progress Update (4/8/14)
As people keep pointing out to me, it’s been a while since I gave an update on Pi2Go progress. This is not because nothing has happened, but actually because so much has been happening that I haven’t sat back and reflected on the work we’ve done. Some highlights:
- Manufacturer in China has been selected and cost of product from them has been agreed
- The first “production” sample has been produced – made using final components, but hand-soldered
- A “Pi2Go-Lite” has been defined, tested and is ready for kitting
- The Raspberry Pi Model B+ caused a redesign of the main PCBs – as the mounting holes and other components are crucial to the design
- A python library has been developed that senses which version of the Pi2Go is in use and acts accordingly
- Extremely effective switching regulator used on both boards – keeps the Pi and wifi connection up even with very low battery levels
- A pan/tilt mechanism has been developed for attaching a Pi camera
- New Pi2Go logo created and Pi2Go is shortly to become a registered trademark
- Selling price for the first production run has been decided
Specifications
|
|
Pi2Go |
Pi2Go-Lite |
| Main PCBA dimensions (mm) |
110 x 80 |
100 x 80 |
| PCBA Colour |
Red |
Yellow |
| Component technology |
Surface Mount |
Through Hole |
| Assembly method |
Fully soldered |
Requires Soldering |
| Supports Model A, B and B+ |
Yes |
Yes |
| Power Supply |
6 x AA |
6 x AA |
| 5V Regulator |
3A Switching |
3A Switching |
| Battery Monitoring |
Yes* |
– |
| Light sensors |
4 x analog |
– |
| RGB LEDs |
4 pairs, hardware PWM |
– |
| White LEDs |
– |
2 front, 2 rear (paired, s/w PWM) |
| Ultrasonic sensor |
Yes |
Yes |
| Line sensors x 2 |
Yes |
Yes |
| IR obstacle sensors |
3 with anti-glare technology** |
2 |
| Wheels |
65mm Black |
65mm Yellow |
| Servo connections |
4 (Hardware PWM) |
2 (Software PWM) |
| I2C Breakout connector |
Yes |
Yes |
| LED indicators for IR sensors |
Yes |
Yes |
| Geared motors ratio |
120:1 |
120:1 |
| Motor connection |
Plug & Socket |
Screw terminal |
| Power connection |
Plug & Socket |
Screw terminal |
| Time to Build (approx/varies) |
20 minutes |
90 minutes*** |
| RRP (ex VAT) |
£59.95 |
£35.95 |
Notes:
* Battery monitoring circuit continuously checks that the battery levels is sufficient to power the motors and the Raspberry Pi. If it starts getting low, then it disables the motors. If it gets even lower then a signal is sent to the Raspberry Pi which can be used to shut down the Pi gracefully. This function can be over-ridden by changing a jumper
** “Anti-glare technology” prevents false triggers in bright sunlight. However the sunlight can still swamp the IR system which can prevent any events being received
*** 90 minutes is estimated based on 1 hour to solder the PCBs and 30 minutes to assemble. Depending on soldering speed and ability, this can vary widely. “Your mileage may vary”
Pan/Tilt Assembly
The same design is used for both Pi2Go and Pi2Go-Lite. Continuing the theme of using PCB material (FR4) as a construction method, we’ve created 4 separate elements that can be used in different combinations:
- Base mounting plate. This can be fixed directly to either version of the Pi2Go using extended pillars on the front mountings. The base mounting plate can:
- Accept a servo for the pan operation
- Accept a camera mounting board directly for a simple front mounted camera
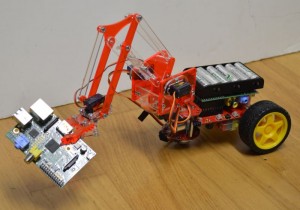
- Note that the servo could also be the base servo for the Me-Arm from Phenoptix – a match made in heaven! (note that Pi2Go-Lite only has 2 servo outputs so cannot control the whole Me-arm)
- Servo arm PCB. This is screwed directly to the arm of a servo in either the pan or tilt positions
- Servo mounting plate. This is fitted to a servo arm PCB for the pan, to mount the tilt servo
- Camera mounting plate. This can be fitted to either the base mounting plate or one the servo arm PCBs
- Use just the base mounting plate and camera mounting plate for a fixed camera
- Use the base mounting plate with a servo, servo arm PCB and camera mounting plate for a camera with pan control
- Use all 4 components (2 of the servo arm PCBs) for a camera with both pan and tilt control
Pi2Go with a MeArm Fitted


